Quick Summary:
To check compatibility, especially between a nailer and compressor, match air pressure (PSI) requirements with your compressor’s output. Ensure the nailer’s air inlet size fits common hoses. Also, consider the nailer’s power source (pneumatic, electric, battery) and ensure it aligns with your project needs and existing tools.
Hey DIYers, Jack Shaffer here from Nailerguy! Ever stared at a shiny new nail gun, excited to start that weekend project, only to realize it won’t connect to your air compressor or it’s just not the right fit for the job? It’s a common hiccup, but one that’s totally avoidable. Getting the right tools on the same page can save you a ton of frustration and, more importantly, make your projects go smoothly.
Don’t worry, we’re going to break down exactly how to check compatibility for your nailers, compressors, and other essential tools. We’ll cover everything you need to know so you can confidently connect your gear and get building. Stick around, and we’ll make sure you’re ready to tackle any project with the right setup!
Table of Contents
Why Compatibility Matters: More Than Just a Good Fit
Think of compatibility like making sure you have the right key for a lock. If it doesn’t fit, it’s not going to open anything, and you’re stuck. When it comes to tools, especially pneumatic nailers and air compressors, the wrong connection or power mismatch can lead to a few unwelcome outcomes.
You might get weak nail drives, leading to nails that don’t sink fully and need a hammer finish – defeating the purpose of a nailer. Or, if your compressor isn’t putting out enough air pressure (PSI), your nailer might just sputter and not fire at all. On the flip side, too much pressure can damage your nailer or even be a safety hazard. And let’s not forget about the physical hook-up. If the air hose fitting on your compressor doesn’t play nice with your nailer’s inlet, you’re not going anywhere.
Beyond air tools, compatibility also extends to project needs. A framing nailer is all wrong for delicate trim work, and a battery-powered finish nailer might not have the power you need for heavy-duty tasks. Understanding these connections ensures your tools work efficiently, safely, and effectively for the job at hand. Let’s dive into how to make sure everything lines up perfectly.
Checking Compatibility: The Nailer and Compressor Connection
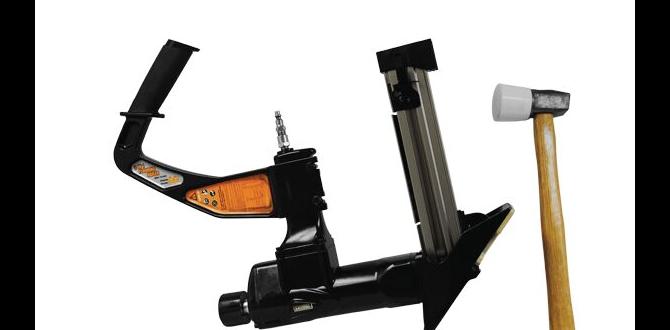
This is where most beginners run into a snag. Pneumatic nailers are fantastic, but they live and breathe air power. Their compatibility dance with an air compressor is crucial. Here’s how to make sure your nailer and compressor are a perfect match:
1. Air Pressure (PSI) Requirements: The Power Play
Every pneumatic nailer has a specific operating pressure range, measured in Pounds per Square Inch (PSI). This is usually found on the nailer itself, in the owner’s manual, or on the manufacturer’s website. Your air compressor needs to be able to supply this pressure.
- What to Look For on the Nailer: A tag or marking will typically show a range like “80-120 PSI” or “90-110 PSI.”
- What to Look For on the Compressor: Your compressor will have a gauge indicating its maximum output PSI.
- The Compatibility Rule: Your compressor’s maximum PSI output must be equal to or greater than the upper end of your nailer’s required PSI range.
Example: If your finish nailer requires 70-100 PSI, your compressor needs to be able to deliver at least 100 PSI. Most compressors can easily handle this, but it’s good to check. If your compressor maxes out at 80 PSI, it might struggle to consistently power a nailer that needs up to 100 PSI, especially if you’re firing a lot of nails.
2. Air Volume (SCFM): The Lung Capacity
While PSI is about how hard the air hits, the volume of air is about how much air is delivered. This is measured in Standard Cubic Feet per Minute (SCFM). Your nailer, especially if you’re using it for extended periods or firing rapidly, needs a steady supply of air. Your compressor’s SCFM rating should meet or exceed the nailer’s demand.
- Where to Find SCFM: The nailer’s manual or specs will list its SCFM consumption. Compressors also have SCFM ratings, usually at a specific PSI (e.g., SCFM @ 90 PSI).
- The Compatibility Rule: Ideally, your compressor’s SCFM output should be at least 1.5 to 2 times the nailer’s SCFM requirement. This buffer ensures the compressor doesn’t run constantly and maintains consistent pressure.
Why so much buffer? When you fire a nail, the tool expends a good amount of air quickly. A compressor with a higher SCFM can replenish that air rapidly, keeping the pressure up for the next shot. If your compressor’s SCFM is too low, you’ll experience pauses as it catches up, leading to inconsistent performance.
3. Air Inlet Size and Couplers: The Physical Connection
This is the most tangible part of compatibility. Your air compressor uses fittings to connect to air hoses, and your nailer has an inlet where the air enters. These need to match.
- Common Fittings: The most common fitting for DIY use is the “industrial” or “automotive” style coupler, often with a 1/4-inch NPT (National Pipe Thread) size.
- What to Check: Look at the end of your air hose and the air inlet on your nailer. They should accept the same type of quick-connect coupler.
- Solutions for Mismatches: Don’t fret if they don’t match out of the box. You can easily purchase adapters or different couplers. For example, if your compressor has a specific type of quick-connect and your nailer has a standard 1/4-inch NPT inlet, you’ll need a 1/4-inch NPT male plug for your hose that matches your compressor’s quick-connect system.
Pro Tip: It’s often easiest to ensure your air hose has the correct coupler for your compressor and then ensure the fittings on the hose (or an adapter used on the hose) match the nailer’s inlet. A quick trip to the hardware store with your nailer’s inlet adapter (if you know it) or a picture of it can help you find the right solution.
For more on air tool fittings, the Engineering Toolbox offers a great overview of various connection types in pneumatics.
4. Hose Diameter and Length: Maintaining Airflow
While less critical than PSI and SCFM for basic compatibility, hose size and length can impact performance, especially for high-demand tools or long runs.
- Diameter: For most DIY nailers, a 3/8-inch diameter air hose is sufficient. Smaller hoses (like 1/4-inch) can restrict airflow, particularly over longer distances, potentially leading to pressure drops.
- Length: Keep your hose as short as practical for your workspace. Long hoses (over 50 feet) can also cause significant pressure loss, reducing the air available to your tool.
If you notice your nailer is underperforming and you’re using a long or narrow hose, consider upgrading to a thicker, shorter hose.
Beyond Pneumatics: Other Tool Compatibility Factors
Compatibility isn’t just about air tools. It’s about ensuring your entire toolkit works together for your project’s success. Let’s look at other common scenarios:
Nailer Power Sources: Electric, Battery, and Pneumatic
Nailers come in different flavors. Ensuring you have the right one for your power availability and mobility needs is key.
- Pneumatic: Requires an air compressor and air hose. Great power, often lighter tools.
- Electric (Corded): Plugs into a standard wall outlet. No compressor needed, but you’re tethered by a cord. Good for finish and brad nailing.
- Battery-Powered (Cordless): Runs on rechargeable batteries. Offers maximum portability – no cords, no compressor. Modern battery tech offers impressive power, but tools can be heavier and more expensive. Battery platform compatibility is crucial here – you want batteries that work across your brand’s tools.
How to Check Compatibility:
- Project Needs: Will you be framing a deck, installing delicate baseboards, or building a birdhouse? Match the nailer type to the task (framing nailer for framing, finish nailer for trim).
- Power Availability: Do you have an outlet nearby? Is portability essential? Will you be working in a remote area?
- Existing Tools: If you already have a good set of cordless tools from one brand (e.g., DeWalt, Makita, Ryobi), sticking with that brand for a new cordless nailer can mean you can use their existing batteries, saving money and hassle.
Saw Blade and Saw Compatibility
If you’re cutting wood, the blade needs to fit your saw and be appropriate for the material and cut type.
- Blade Diameter: Circular saws, miter saws, and table saws all use specific blade diameters (e.g., 7-1/4 inch, 10 inch, 12 inch). The blade must match the saw’s housing.
- Arbor Size: This is the hole in the center of the blade. It must match the arbor shaft on your saw. Common sizes are 5/8 inch or sometimes with a specific washer set for 1 inch arbors.
- Tooth Count and Type: A higher tooth count is better for smoother, cleaner cuts (like hardwoods or trim). A lower tooth count is good for faster, rougher cuts (like framing lumber). Ensure the blade material (e.g., carbide-tipped) is suitable for the material you’re cutting (wood, metal, masonry).
Safety First: Always ensure the maximum RPM (revolutions per minute) rating on the blade is higher than the no-load RPM of your saw. This is a critical safety specification.
For more on saw blade selection, the Wood Magazine often has excellent, practical advice for woodworkers.
Accessory Compatibility: Batteries, Chargers, and Cases
When you invest in a cordless tool system, the ecosystem around it becomes important.
- Battery Platforms: As mentioned, if you have a brand like Milwaukee M18 or Bosch 18V, their batteries are designed for their entire M18 or 18V line respectively. You can’t use a Milwaukee battery in a Bosch tool, or vice-versa.
- Chargers: Ensure your charger is compatible with your battery voltage and chemistry (e.g., Li-ion).
- Tool Cases: Many brands now offer modular tool case systems (like TSTAK, PACKOUT, L-BOXX) that click together, making storage and transport much more organized. Check if your new tool comes with a case designed for this system if you’re invested in one.
Project Materials and Tool Capabilities
Sometimes compatibility is less about physical connections and more about whether the tool is suited for the material you’re working with.
- Wood Types: Hardwoods are more challenging to cut and fasten than softwoods. You might need more powerful tools or specific blades/fasteners.
- Composite Materials: Some composite decks or engineered woods require specialized blades to avoid burning or excessive wear.
- Metal Fastening: Standard nail guns aren’t for metal. You’d need specific tools like concrete nailers or metal stud framers.
Always verify that your chosen tool is designed for the material you intend to use it on. Reading product descriptions and reviews is invaluable here.
A Quick Compatibility Checklist for Nailers and Compressors
To make things super clear, here’s a handy checklist you can use when pairing a new nailer with your existing compressor.
| Feature to Check | Where to Find Info (Nailer) | Where to Find Info (Compressor) | Compatibility Goal |
|---|---|---|---|
| Operating PSI Range | Tool body, Manual, Manufacturer’s Website | Pressure Gauge, Manufacturer’s Specs | Compressor Max PSI ≥ Nailer Max PSI Required |
| SCFM Consumption (at 90 PSI) | Manual, Manufacturer’s Website | Compressor Tag/Label, Manufacturer’s Specs | Compressor SCFM Output ≥ 1.5 – 2x Nailer SCFM Consumption |
| Air Inlet Size | Tool body, Manual | Hose/Coupler Fitting | Air hose coupler matches nailer inlet (or adapter is used) |
| Hose Diameter Recommendation | Manual | N/A (Hose dependent) | Prefer 3/8″ for most applications, avoid undersized hoses. |
| Hose Length Recommendation | Manual | N/A (Hose dependent) | Keep hose runs as short as practical (under 50 ft ideal). |
This table covers the core aspects. If all these points align, you’re in for a smooth operation!
Troubleshooting Common Compatibility Issues
Even with the best intentions, sometimes you might encounter issues. Here are a few common problems and how to fix them:
Issue: Nails not fully sinking (weak drives)
- Possible Causes: Low air pressure, insufficient air volume (SCFM), leak in the air system, wrong setting on the nailer (depth adjustment).
- Solutions:
- Check compressor PSI and adjust to the nailer’s requirement.
- Ensure your compressor can keep up with the SCFM demand.
- Inspect all connections and hoses for leaks.
- Adjust depth of drive on the nailer.
Issue: Nailer not firing at all
- Possible Causes: No air supply, safety trigger not engaged, low pressure, internal tool issue, wrong power source.
- Solutions:
- Verify the compressor is on and delivering air.
- Ensure the safety contact tip is pressed against the workpiece and the trigger is pulled.
- Check that the compressor is set to the nailer’s minimum required PSI.
- Confirm you have the correct power source (battery charged, plugged in, compressor on).
Issue: Air leaking from connections
- Possible Causes: Loose fittings, damaged O-rings or seals, incorrect coupler type.
- Solutions:
- Tighten hose connections.
- Inspect couplers and fittings for wear or damage; replace as needed.
- Use a soapy water solution to spray on connections and find the exact leak point.
A well-maintained tool and system are easier to keep compatible and running efficiently. For more in-depth troubleshooting, resources like the Occupational Safety and Health Administration (OSHA) provide guidelines on the safe use and maintenance of pneumatic tools.
FAQ: Your Compatibility Questions Answered
Q1: Can I use any air hose with my nailer and compressor?
A1: Not exactly. While most air hoses are designed to work with common fittings, you need to ensure the coupler on the hose matches your compressor’s outlet and that it can handle the PSI and SCFM your nailer requires. It’s best to use hoses rated for at least 150 PSI and typically 3/8-inch diameter for most nail guns.
Q2: My new nailer seems to be working, but the nails aren’t going in very deep. What’s wrong?
A2: This is a classic sign of insufficient air pressure or volume. First, check that your compressor is set to the proper operating PSI for your nailer. Also, consider if your compressor’s SCFM output is adequate for the nailer’s demand, especially if you’re firing nails rapidly. A longer or thinner air hose can also cause pressure drop.
Q3: Do I need a special compressor for framing nailers