Quick Summary:
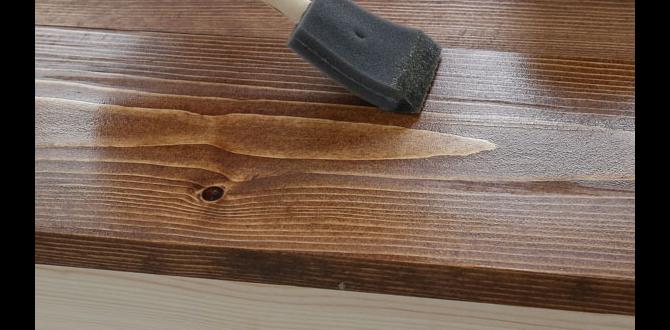
To calibrate depth settings on your nailer, adjust the nosepiece depth control until nails are perfectly flush or slightly countersunk. Test on scrap wood, making small increments of adjustment. This ensures clean finishes and prevents damage to your workpiece.
Hey everyone, Jack Shaffer here from Nailerguy! Ever finished a project, only to find your nails sticking out too much, or worse, sinking way too deep and splitting the wood? It’s a super common frustration, especially when you’re just starting out with a nailer. That little dial or lever that controls how deep the nail goes? Getting that just right is key to making your projects look professional and saving you a lot of rework. Don’t worry, it’s not as tricky as it sounds! We’re going to walk through this step-by-step, and you’ll be calibrating your nailer like a pro in no time. Stick around as we dive into this genius guide to perfect depth settings!
Table of Contents
Why Dialing In Depth Settings Matters
Getting the depth setting right on your nailer is more than just about appearances; it’s about the integrity and finish of your project. When the depth is off, you can run into a few common problems:
- Nails Proud: If the nail isn’t driven deep enough, the head will stick up above the wood’s surface. This looks sloppy and can snag on things. You’ll then have to try and hammer them down, which can mar the wood.
- Overt Cunning: Driving the nail too deep, or ‘countersinking’ it too much, can split the wood or create an unsightly crater. This is especially problematic with softer woods or thin materials and often requires patching or filler to fix.
- Compromised Hold: If a nail is barely sunk, it won’t hold as securely. Conversely, driving it too deep can sometimes reduce the holding power, particularly in dense hardwoods where you might be trying to drive through and create a proper joint.
- Damage to Workpiece: Excessive depth can punch through thin veneers or damage delicate surfaces, leading to costly repairs or wasted material.
The goal is usually to have the nail head sit flush with the wood surface, or just slightly below it so the head is hidden but not damaging the surrounding material. This is where calibrating your depth settings comes into play. It’s a simple process that makes a huge difference in the quality of your work.
Understanding Your Nailer’s Depth Adjustment
Before we start calibrating, let’s talk about how most nailers let you adjust the depth. While the exact mechanism can vary between different types of nailers (like brad nailers, finish nailers, and framing nailers) and brands, there are a few common methods:
Common Depth Adjustment Mechanisms
- Rotating Wheel/Knob: This is perhaps the most common. You’ll often find a wheel or knob located near the nose of the nailer, sometimes behind a trigger guard or on the side. Turning it in one direction usually drives nails deeper, and turning it the other way retracts them.
- Adjustable Shoe/Nosepiece: Some nailers have a movable part at the end of the magazine, near the firing point. You might have to loosen a screw or engage a lever to slide this piece in or out, effectively changing your depth.
- Depth Selector Lever: A few models feature a dedicated lever that clicks into different positions, offering pre-set depth options.
- Tool-Free Adjustment: Many modern nailers pride themselves on tool-free adjustments, meaning you can make changes on the fly without needing any extra tools.
Pro Tip: Always consult your nailer’s owner’s manual! It will show you exactly where and how to adjust the depth setting for your specific model. You can usually find these manuals online through the manufacturer’s website if you’ve lost your copy. For example, DeWalt offers a comprehensive library of manuals for their tools.
Step-by-Step Guide: Calibrating Depth Settings
Alright, let’s get down to business and calibrate your nailer! This process is pretty straightforward, but it requires patience and a bit of testing. We’ll assume you’re using a common rotating wheel or knob for adjustment, but the principles apply to other types too.
Step 1: Gather Your Supplies
You won’t need much, but having these items ready will make the process smooth:
- Your nailer (brad, finish, or other)
- The correct size and type of nails for your nailer
- Scrap wood (preferably a piece similar to what you’ll be working with for your project)
- Safety glasses (always!)
- Work gloves (optional, but recommended)
Step 2: Prepare Your Workspace and Nailer
Find a well-lit area where you have some space to work. Lay out your scrap wood. Ensure your nailer is gassed up (if it’s pneumatic) or has a charged battery (if it’s cordless). Make sure there are no stray nails in the magazine, and then load it with a few fasteners.
Step 3: Set a Starting Depth
Most nailers have a “zero” or default setting, often indicated by a minus or a shallowest mark. If yours does, start there. If you’re unsure, set the adjustment to what looks like the shallowest setting. This is our baseline. We’ll be working our way towards the correct depth.
Step 4: Make Your First Test Shot
Put on your safety glasses! Hold the nailer firmly against the scrap wood. It’s important to press the nose of the nailer down firmly onto the surface, mimicking how you’d nail into your actual project. This engages the safety contact tip, which is necessary for firing. Squeeze the trigger. Be ready for the noise!
Step 5: Inspect the Nail
Carefully examine how the nail has entered the wood. Is the head sitting above the surface (proud)? Is it flush? Or is it digging in too deep and creating a dimple or split?
Step 6: Adjust and Repeat
This is where the calibration happens:
- If the nail is proud: You need to drive it deeper. Turn your depth adjustment wheel or knob slightly in the direction that increases depth. Make a small adjustment. Fire another nail and check again.
- If the nail is sinking too deep: You need to drive it shallower. Turn your depth adjustment wheel or knob slightly in the direction that decreases depth. Make a small adjustment. Fire another nail and check again.
- If the nail is perfect: Congratulations! You’ve found your setting.
Continue making small adjustments and test firing until the nail sits perfectly flush with the surface of the wood, or just slightly countersunk. It’s better to make tiny adjustments and multiple tests than to make a big change and overshoot your mark.
Step 7: Fine-Tune for Different Materials
Once you have a good general setting, remember that different wood types and thicknesses might require minor tweaks. Softer woods like pine might allow nails to sink more easily, while hardwoods like oak might resist more. Thinner materials might split if you drive nails too deep. If you’re working on a critical project with a specific material, do a few test shots on that material to confirm the depth.
Step 8: Lock in Your Setting (If Applicable)
Some nailers have a way to lock your depth adjustment to prevent it from moving accidentally during use. If yours does, make sure to engage this lock once you’ve found your perfect setting.
What to Aim For: The ideal depth is usually when the nail head is just below or perfectly flush with the wood surface. For tasks like installing trim, you want the nail head slightly countersunk so you can easily fill the dimple with a bit of wood filler or putty, making it disappear. For structural framing, a slightly proud nail might be acceptable, but flush is generally preferred for a clean look.
Tips for Precision and Avoiding Common Pitfalls
Even with a step-by-step guide, a few extra tips can ensure your calibration is spot-on and help you avoid common headaches.
Precision Tips:
- Consistency is Key: Always press the nose of the nailer firmly and squarely onto the wood. Avoid angling the tool, as this can affect depth and lead to bent nails.
- Use the Right Nails: Ensure you are using the exact size and type of nails recommended for your nailer. Using the wrong nails can cause jams and affect driving depth.
- Power Matters: For pneumatic nailers, consistent air pressure is crucial. Too little pressure and nails won’t drive fully; too much and they might sink too deep or even damage the tool. Check your air compressor’s regulator to ensure it’s set to the manufacturer’s recommended PSI range (often found in the nailer’s manual). A good resource for understanding pneumatic tools and air pressure is the Occupational Safety and Health Administration (OSHA), which provides safety guidelines for powered tools.
- Battery Life: For cordless nailers, a weak battery can lead to inconsistent power delivery, affecting nail depth. Make sure your battery is fully charged for testing.
- Test on a Representative Surface: As mentioned, test on wood that is similar in hardness, species, and thickness to your project material. A setting that works perfectly on 3/4″ pine might need adjustment for 1/2″ oak plywood.
Avoiding Pitfalls:
- Don’t Overtighten the Adjustment: If your depth adjustment mechanism feels stiff, don’t force it. This can strip the threads or break a small part. Work gently.
- Watch Out for the Safety Contact Tip: This tip often needs to be depressed against the surface for the nailer to fire. Make sure you are pressing it down firmly and squarely. If it’s not engaged, the tool simply won’t shoot.
- Beware of Splitting: For delicate trim or thin wood, approach your depth setting cautiously. Start shallow and increase depth gradually. Also, consider the placement of nails – avoid placing them too close to the edge of the wood, as this increases the risk of splitting. This is a common issue highlighted by woodworking resources like Wood Magazine’s safety tips.
- Work in Sections: If you’re framing a large project or installing many linear feet of trim, you might need to re-check your depth setting periodically. Vibration or minor impacts can sometimes cause adjustments to shift, or you might encounter variations in the material you’re working with.
- Cleanliness: A dirty or gummed-up depth adjustment mechanism can be stiff or inaccurate. If you’re having trouble, a quick clean with a brush and some light lubricant (check your manual for recommendations) might help.
Calibrating Different Nailer Types
While the core principle of testing and adjusting remains the same, there are slight differences in how you approach calibration for various nailer types.
Brad Nailers vs. Finish Nailers
Brad nailers are designed for small, thin nails (like 18-gauge or 16-gauge) used for delicate trim, mouldings, and crafts. Finish nailers use slightly larger nails (like 15-gauge or 14-gauge) for baseboards, door casings, and heavier trim work. For both, the goal is usually a slightly countersunk nail head that can be easily filled, providing a seamless finish.
The depth adjustment on these tools is critical because you’re often working with visible surfaces where even a slight overage or undertage is noticeable. You’ll want to achieve that perfect “just below the surface” look.
Framing Nailers
Framing nailers use large, robust nails (like 2″ to 3.5″ long) for structural work like building walls, decks, and roofs. The depth setting here is more about ensuring the nail has enough power to penetrate the framing members fully and provide a secure connection. While a perfectly flush head is nice, a slightly proud nail that still provides a strong hold is often acceptable in framing.
The adjustment on framing nailers might be coarser, meaning each increment of adjustment has a more significant effect. So, when calibrating a framing nailer, make sure you’re testing into two pieces of wood that represent your actual framing lumber. Avoid testing on thin plywood, as it won’t give you an accurate representation of performance.
Pin Nailers
Pin nailers use extremely fine headless or virtually headless pins (like 23-gauge). They are ideal for holding delicate trim in place while glue dries or for applications where you don’t want any visible fastener marks. Because the pins are so small, the “depth” is less about sinking a head and more about ensuring the pin penetrates fully into both pieces of material without bending.
The depth adjustment on pin nailers is often very sensitive. You’re looking for the pin to be driven completely flush with the surface, disappearing entirely if called for by the application. Due to their delicate nature, these require careful calibration.
Troubleshooting Depth Issues
Sometimes, even after careful calibration, you might run into problems. Here are a few common issues and how to fix them:
Problem: Nails Not Driving or Only Partially Driving
- Possible Causes:
- Low air pressure (pneumatic)
- Weak battery (cordless)
- Depth set too shallow
- Safety contact tip not fully engaged
- Nailer malfunction/jam
- Solutions:
- Check and adjust air pressure or battery charge.
- Increase the depth setting incrementally.
- Ensure the contact tip is pressed firmly against the wood.
- Clear any jams and inspect the nailer.
Problem: Nails Driving Too Deep (Splitting Wood)
- Possible Causes:
- Depth set too deep
- Softwood material
- Nailing too close to the edge of the wood
- Excessive air pressure (pneumatic)
- Solutions:
- Decrease the depth setting incrementally.
- Be extra careful with softwoods, possibly pre-drilling pilot holes for critical joints.
- Keep nails a safe distance from edges.
- Check and reduce air pressure if necessary.
Problem: Nails Bending
- Possible Causes:
- Nailing into very dense hardwood
- Depth set too deep for the material
- Nailer not holding the nail straight
- Nailgun not striking the nail squarely
- Solutions:
- Try increasing the depth setting slightly to ensure full drive power.
- Consider pre-drilling pilot holes in extremely dense wood.
- Ensure the nailer is held square to the work surface.
- Inspect the nail gun’s magazine for any misalignment.
If you’re consistently struggling with depth settings, especially with a particular type of wood, don’t hesitate to consult online forums or even reach out to the tool manufacturer’s customer support. Websites like Fine Homebuilding’s Tools and Techniques section can offer great insights from experienced builders.
FAQ: Your Depth Calibration Questions Answered
Here are some common questions beginners ask about calibrating their nailer’s depth settings:
Q1: What is the best depth setting for woodworking projects?
A1: The “best” setting varies, but typically you want the nail head to be flush with the wood surface or slightly countersunk (just below the surface). This allows for easy filling with putty or wood filler, creating a clean, invisible fastener. For structural work, a secure hold is paramount, even if the head isn’t perfectly flush.
Q2: How often do I need to calibrate my nailer’s depth?
A2: You should calibrate your nailer whenever you switch to a different type of wood (hardwood vs. softwood, different thicknesses), when you start a new project, or if you notice inconsistent nail depth during a project. It’s also wise to re-check it if the nailer has been dropped or bumped.
Q3: My nailer has a depth adjustment knob. Which way do I turn it to drive nails deeper?
A3: This varies by manufacturer. Often, turning the knob towards the “+” symbol, a higher number, or away from the tool’s body drives nails deeper. Conversely, turning towards “-“, a lower number, or towards the tool’s body will reduce depth. Always check your nailer’s manual for specifics.
Q4: Can I use my nailer without the depth adjustment knob?
A4: No, you should never operate a nailer without the depth adjustment mechanism properly installed, if it’s removable. It’s a vital part of the tool’s operation and safety features. If it’s damaged or missing,