Quick Summary:
A brad nailer is an excellent tool for attaching small molding. Look for a 18-gauge brad nailer with a slim nose and adjustable depth. Ensure it fits comfortably in your hand and has the power to drive nails without damaging delicate trim. This guide will walk you through choosing, using, and mastering your brad nailer for perfect molding installation every time.
Hey there, woodworkers and DIYers! Jack Shaffer here from Nailerguy. Are you staring down a beautiful piece of small molding, wondering how to attach it cleanly and securely without making a mess? You’re not alone. Many beginners find this a tricky step, worrying about damaging delicate trim or having nails stick out awkwardly. But don’t sweat it! With the right tool and a little know-how, installing small molding can be a breeze. We’re going to cover exactly what you need so you can achieve professional-looking results. Get ready to transform your projects!
Table of Contents
Choosing the Right Brad Nailer for Small Molding
When it comes to small molding, not all nailers are created equal. You need a tool that’s precise, powerful enough, and gentle on your materials. This is where the 18-gauge brad nailer shines.
Why an 18-Gauge Brad Nailer is Your Best Friend
The “gauge” of a nail refers to its thickness. A lower gauge number means a thinner nail. Here’s why 18-gauge is perfect for small molding:
- Minimal Damage: 18-gauge nails are thin, creating small holes that are easy to conceal. This is crucial for delicate trim that you don’t want splitting or showing large blemishes.
- Good Holding Power: While thin, these nails are strong enough to hold most small molding securely in place, especially when used with a bit of wood glue.
- Versatility: An 18-gauge brad nailer is useful for a wide range of smaller woodworking tasks beyond just molding, like attaching decorative trim, picture frames, and even some lighter furniture components.
Key Features to Look For
When you’re shopping for a brad nailer for your molding projects, keep these important features in mind:
1. The Nose Assembly
This is the business end of your nailer. For small molding, you want a nose that is:
- Slim and Narrow: A slender nose allows you to get into tight corners and position the nail precisely where you want it, minimizing the chance of marring the molding surface.
- Non-Mar Tip (Optional but Recommended): Some nailers come with a rubberized or specialized tip designed to prevent accidental dents or scratches on softer woods or finished surfaces.
2. Power and Pressure
Your nailer needs enough power to drive the nail fully into the wall or substrate without bending it. This usually depends on the air pressure (for pneumatic nailers) or battery power (for cordless models).
- Pneumatic Nailers: These require an air compressor. You’ll need to set the correct PSI (pounds per square inch). A good starting point for 18-gauge brads in softer woods is around 70-90 PSI, but always refer to your nailer’s manual. For harder woods or deeper driving, you might need to increase it slightly.
- Cordless Nailers: These use batteries and often have adjustable power settings. Ensure the battery is fully charged for consistent performance.
It’s important to test the power on a scrap piece of wood that matches your molding material before you start on the actual project. Too much power can blow through thin molding or split it; too little, and the nail won’t sit flush.
3. Ergonomics and Weight
You might be holding this tool for a while, especially on larger projects. A comfortable grip and a well-balanced tool will reduce fatigue and improve accuracy.
- Grip: Does it feel good in your hand? Is it too bulky or too small?
- Weight: Lighter is generally better, but don’t sacrifice power or build quality solely for weight.
- Balance: How does the tool feel when you’re holding it in a working position?
4. Nailer Type: Pneumatic vs. Cordless
This is a big decision! Both have their pros and cons for small molding.
Pneumatic Brad Nailers
These are powered by compressed air from an air compressor via a hose.
Pros:
- Generally lighter and smaller than cordless counterparts.
- Often more affordable upfront.
- Consistent power delivery.
- Less maintenance related to batteries.
Cons:
- Require an air compressor, which adds cost, noise, and takes up space.
- The air hose can be cumbersome and limit mobility.
- Need to manage air pressure settings.
Cordless Brad Nailers
These run on batteries and have an integrated motor, offering complete freedom of movement.
Pros:
- Ultimate portability – no hoses or compressors needed.
- Quick setup and takedown.
- Ideal for remote locations or tight spaces where an compressor is a hassle.
Cons:
- Can be heavier and bulkier due to the battery and motor.
- Higher upfront cost.
- Battery life can limit long work sessions; you might need spares.
- Power delivery can sometimes be less consistent than pneumatic, especially on cheaper models.
For small molding, either can work well. If you already have an air compressor or are planning other air-powered tool projects, a pneumatic nailer is a solid choice. If you value maximum convenience and portability, especially for smaller jobs or work around the house, a cordless model is fantastic.
5. Brad Nail Size Compatibility
Ensure the nailer you choose is designed for 18-gauge brad nails. Most 18-gauge nailers will accept nails typically ranging from 5/8 inch up to 2 or 2-1/2 inches. For small molding, you’ll primarily be using nails in the 1-inch to 1-1/2 inch range.
Essential Accessories and Supplies
Once you’ve got your brad nailer, you’ll need a few other things to make your molding installation project a success.
Nails
Always use the correct size and type of brad nails for your nailer. For 18-gauge nailers, you’ll need 18-gauge brad nails. Pay attention to the length:
- Length: Choose a length that will go through your molding and securely into the wall stud or substrate (drywall is not strong enough to hold molding on its own; you want to hit framing if possible). Typically, 1-1/4 inch or 1-1/2 inch nails are standard for many small moldings.
- Material: Most are steel. Stainless steel or galvanized nails can be useful if the molding is in a damp environment, but for interior trim, standard steel is fine.
It’s a good idea to buy a few different lengths to test, as wall materials can vary.
Wood Glue
Even with nails, wood glue is your secret weapon for a strong, lasting bond. Apply a bead of quality wood glue to the back of the molding before you nail it in place. This ensures the molding won’t ever creak or pull away.
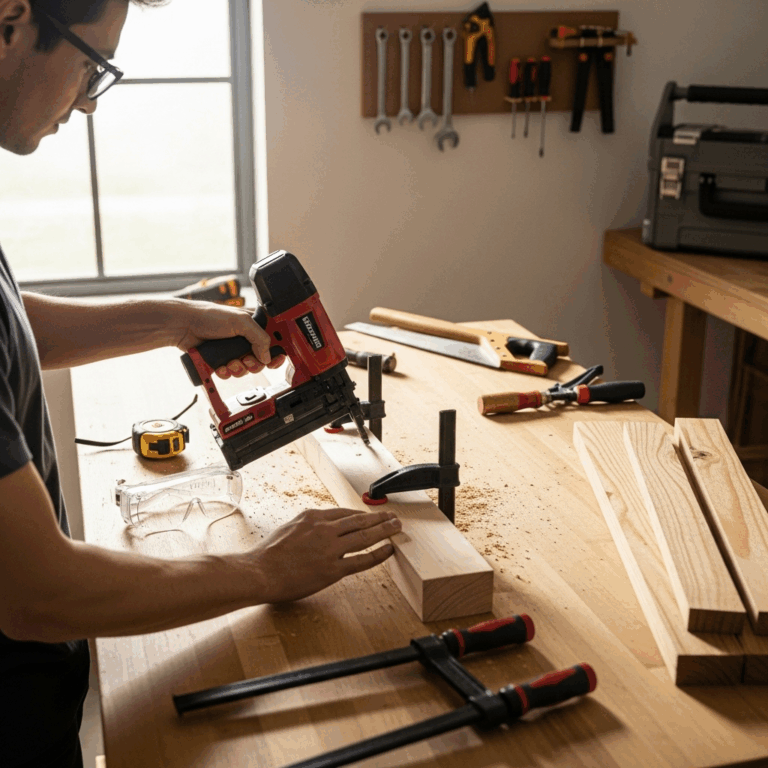
Safety Gear – Non-Negotiable!
Safety first, always! Operating any power tool comes with risks. Your essential safety gear includes:
- Safety Glasses: Absolutely mandatory. Flying nail fragments or debris can cause serious eye injury.
- Hearing Protection: While brad nailers aren’t as loud as framing nailers, prolonged use can still affect your hearing. Earplugs or earmuffs are a good idea.
- Work Gloves: Protect your hands from splinters and provide a better grip.
You can find excellent safety guidelines from organizations like the Occupational Safety and Health Administration (OSHA), which often cover safe tool operation.
Optional but Helpful
- Silicone or Rubber Mat: To protect your flooring when working indoors.
- Measuring Tape and Pencil: For accurate cuts and placement.
- Miter Saw: For making precise angled cuts for corners.
- Stud Finder: To locate wall studs for secure fastening.
- Putty Knife and Wood Filler/Putty: For making nail holes disappear.
How to Use Your Brad Nailer for Small Molding
Now that you have your tools and supplies, let’s get down to business. Follow these steps for a smooth installation.
Step 1: Prepare Your Workspace and Molding
Before you even pick up the nailer, make sure you’re ready:
- Measure and Cut: Accurately measure the wall space where the molding will go and cut your molding pieces to size. Use a miter saw for clean, angled cuts at corners.
- Dry Fit: Place the molding pieces against the wall without glue or nails to check the fit. Make any necessary adjustments.
- Locate Studs: Use a stud finder to mark the location of wall studs where you plan to place your molding. This is crucial for a secure attachment. If you can’t hit a stud, you’ll primarily be nailing into drywall, which is less secure. Aiming for studs is always best.
- Clean Surfaces: Ensure both the back of the molding and the wall surface are clean and free of dust or debris.
Step 2: Set Up Your Brad Nailer
If you’re using a pneumatic nailer, connect it to your air compressor and set the PSI. It’s best to start at the lower end (around 70-80 PSI) and increase if needed.
If you’re using a cordless nailer, ensure the battery is charged and in place.
Load the correct size 18-gauge brad nails into the magazine according to your nailer’s instructions.
Crucial Tip: Always aim for the stud. Your molding needs to be attached to something solid. Drywall alone won’t hold it long-term, especially if it’s heavier trim or in a high-traffic area.
Step 3: Apply Wood Glue
Apply a thin, consistent bead of wood glue along the back of the molding piece you’re about to install. Don’t go overboard – you don’t want excessive glue squeeze-out.
Step 4: Position the Molding and Nail
Place the glued molding firmly against the wall in its intended position. Hold it securely with one hand.
With your other hand, position the nose of the brad nailer against the molding where you want to drive a nail. Make sure the nose is flat against the surface.
Press the safety contact tip (the part that sits on the surface) firmly against the molding. This is a safety feature that prevents the nailer from firing when not pressed against a surface.
Either squeeze the trigger (if your nailer has a sequential trigger) or bump the trigger (if it has a contact trip mode set up) to drive the nail. Don’t be afraid to hold the trigger for a moment to ensure the nail is fully seated.
Step 5: Nail Placement Strategy
For small molding, strategic nail placement is key to a strong and invisible finish.
- Hit the Studs: Make sure at least one nail in each section goes into a wall stud.
- Spacing: For typical small molding (like baseboards or crown molding), nails can be spaced about 16-24 inches apart.
- Along Edges: Drive nails near the top and bottom edges of the molding where possible, but be careful not to overdrive them and split the wood.
- Into Framing: If installing picture rail molding, ensure nails go into the studs directly behind the molding.
Step 6: Drive Nails Flush or Slightly Recessed
Your goal is to have the nail head sit flush with the surface of the molding, or slightly countersunk (recessed below the surface). This makes filling the hole much easier and less noticeable.
- Too Proud: If the nail head is sticking up, it means your pressure might be too low, or you hit a very hard knot in the wood. You can sometimes gently tap a proud nail in with a hammer and nail set, but it’s best to adjust your tool’s settings.
- Too Deep: If the nail has driven too far into the wood, it can create a larger hole than desired and potentially damage the wood fibers around it. This is usually a sign of too much pressure.
Most modern brad nailers have an adjustable depth setting, which is incredibly helpful. Start with the recommended setting or a shallower one and increase it as needed.
Step 7: Finishing Touches
Once all your molding is nailed in place and the glue has dried:
- Fill Nail Holes: Use a good quality wood filler or putty that matches your molding’s color. For painted molding, a simple paintable wood filler is perfect. For stained molding, you’ll need to find a stainable putty or filler.
- Slight Oversanding: Lightly sand the filled holes and any minor blemishes once the filler is dry.
- Caulking: For a truly seamless look, especially between the molding and the wall or ceiling, apply a bead of paintable caulk.
- Painting or Staining: Finish your molding with paint or stain as desired.
Common Problems and Solutions
Even with the best intentions, you might encounter a few hiccups. Here’s how to troubleshoot:
Problem: Nail Jammed in the Nailer
This is frustrating! The first step is always to disconnect the air supply (pneumatic) or remove the battery (cordless) for safety.
- Cause: Bent nail, incorrect nail size, worn-out driver blade, or debris in the mechanism.
- Solution: Consult your nailer’s manual for specific jam-clearing instructions. Often, there’s a latch or panel you can open to access the jam. Carefully remove any obstruction. If nails are consistently bending, check if you’re using the right size for the wood density or if your air pressure is too low (pneumatic). If the problem persists, the driver blade might be worn, and you may need service.
Problem: Nail Fails to Drive Fully
Your nail is sticking out too much.
- Cause: Insufficient air pressure (pneumatic), weak battery (cordless), too hard of wood, or incorrect depth setting.
- Solution:
- Pneumatic: Increase air pressure gradually (5 PSI at a time) until the nail drives fully.
- Cordless: Ensure the battery is fully charged. Try a higher power setting if available.
- Wood: If it’s a very hard piece of wood or a knot, you might need slightly higher pressure or a slightly longer nail. Test on scrap first.
- Depth Setting: Ensure the depth adjustment is set to drive nails deeper.
Problem: Nail Splits the Molding
A dreaded outcome, especially with thin or soft woods.
- Cause: Too much pressure, hitting too close to the edge of the molding, or not using glue.
- Solution:
- Reduce Pressure: Lower the PSI on your pneumatic nailer or use a lower power setting on your cordless model.
- Nail Placement: Ensure you’re not too close to the thin edge of the molding. Try to drive nails into the thicker parts.
- Pre-Drill (Last Resort): For extremely delicate molding, you could pre-drill a tiny pilot hole where each nail will go, but this defeats the purpose of a nailer for efficiency.
- Use Glue: Wood glue helps reinforce the wood fibers, reducing the chance of splitting when the nail is driven.
Problem: Nailer Not Firing
The tool does nothing when you press it.
- Cause: Safety contact tip not engaged, low air pressure, dead battery, or a mechanical issue.
- Solution:
- Check Safety: Ensure the contact tip is pressed firmly against the molding surface.
- Pneumatic: Check the air compressor tank is pressurized and the regulator is