Quick Summary: The best roofing nailer for DIY is a lightweight, cordless or electric model with adjustable depth and safety features. For simple repairs, a corded option works well, but for full roofs, a battery-powered one offers freedom. Prioritize ease of use and safety for a successful project.
Hey there, fellow DIYers! Tackling a roof project can seem a bit daunting, right? You’ve got the shingles, the underlayment, and then there’s the matter of securely fastening everything. This is where the workhorse of roofing comes in: the roofing nailer. Choosing the best roofing nailer for DIY can feel like navigating a maze of options, especially when you want a tool that’s effective, safe, and won’t break the bank. But don’t worry, I’m here to break it all down for you. We’ll explore what makes a good roofing nailer for home projects, look at different types, and figure out which one will be your reliable partner for getting that roof in top shape.
We’ll cover everything you need to know, from understanding the different power sources to picking out the features that will make your DIY roofing job smoother and more successful. Let’s get your project covered!
Table of Contents
Why a Roofing Nailer is a DIYer’s Best Friend
When you’re looking at a DIY roofing project, whether it’s a small repair or shingling a whole shed, efficiency and durability are key. Traditionally, this meant a hammer and a whole lot of elbow grease, which can be slow, tiring, and potentially lead to uneven nail depth – not ideal for a weather-tight seal!
A roofing nailer automates this process. These specialized tools drive nails quickly and consistently, saving you hours of work and reducing the physical strain. For a DIYer, this translates to:
- Speed: Significantly faster than hammering by hand.
- Consistency: Nails are driven to a similar depth each time, ensuring a secure grip on shingles and preventing nail heads from popping up or sinking too far.
- Reduced Fatigue: Less pounding means less strain on your arms, shoulders, and back, which is a huge plus when you’re working on a ladder or the roof itself.
- Professional Results: The consistent nail placement often leads to a neater, more professional-looking finish.
Types of Roofing Nailers for DIY Projects
The biggest differentiator for roofing nailers is their power source. Each type has its own set of pros and cons, making one better suited for certain situations or user preferences. Understanding these will help you find the best roofing nailer for DIY work.
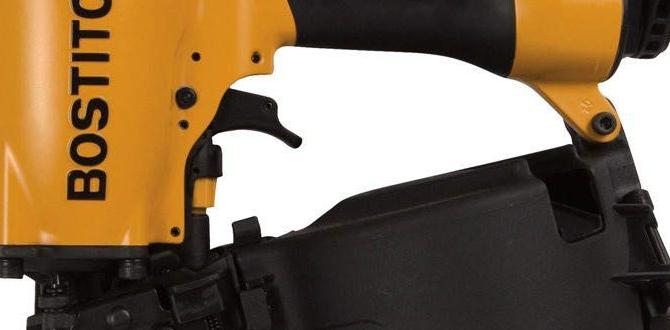
1. Pneumatic (Air-Powered) Roofing Nailers
These are the workhorses you often see professionals using on construction sites. They run on compressed air from an air compressor.
Pros:
- Power & Speed: Generally the most powerful and fastest nailers available.
- Lightweight Tool: The nailer itself is often lighter because the motor is the compressor.
- Durability: Known for being robust and long-lasting.
- Cost-Effective: The nailer itself can be less expensive than high-end cordless models.
Cons:
- Requires an Air Compressor: You need to purchase or rent an air compressor, which adds to the overall cost, weight, and complexity.
- Hose Management: A pneumatic hose can get in the way, especially on a sloped roof, creating a trip hazard.
- Noise: Air compressors can be quite loud.
- Maintenance: Air compressors and hoses require some maintenance (draining water, checking for leaks).
Best For: Larger roofing jobs where speed and power are paramount, and you don’t mind managing the compressor and hose. If you already own an air compressor for other DIY projects, this can be a cost-effective route.
2. Cordless (Battery-Powered) Roofing Nailers
These are becoming increasingly popular with DIYers due to their convenience and freedom of movement. They run on rechargeable battery packs.
Pros:
- Portability & Freedom: No hoses or compressors means you can move around freely and safely. This is a huge win for DIYers.
- Ease of Use: Simply charge the battery, load nails, and go. Less setup required.
- Quieter Operation: Generally quieter than pneumatic systems.
- Consistent Power: Modern battery technology delivers reliable power for driving nails consistently.
Cons:
- Higher Initial Cost: Cordless models, especially good ones, tend to have a higher upfront price.
- Battery Dependence: You need to ensure batteries are charged. Running out of power mid-job can halt progress unless you have spares.
- Weight: The battery adds weight to the tool, though often still manageable.
- Runtime: Battery life can be a limiting factor for very large projects if you don’t have multiple batteries or a way to recharge quickly.
Best For: DIYers who prioritize convenience, ease of setup, and safety, especially for moderate-sized projects like shed roofs, garages, or smaller house roofs. Ideal if you don’t want to invest in or manage an air compressor.
3. Electric (Corded) Roofing Nailers
These plug directly into a standard electrical outlet. While less common for full roofing jobs, they can be a budget-friendly option for very small repairs or specific light-duty applications.
Pros:
- Lower Cost: Often the most affordable option upfront.
- No Batteries or Compressors: Simple power source, just plug it in.
- Lightweight: Typically very light as they don’t house a battery or air motor.
Cons:
- Limited Mobility: You are tethered by an extension cord, which is a significant safety concern and inconvenience on a rooftop or ladder.
- Less Power: Generally less powerful than pneumatic or high-end cordless models, sometimes struggling with harder materials or deeper drives.
- Not Ideal for Shingles: Their power and nail collation might not be optimized for standard roofing shingles.
- Tripping Hazard: The cord poses a serious safety risk.
Best For: Very small, occasional repairs where mobility isn’t an issue, and you can easily access power. Generally not recommended for full roof re-shingling projects for DIYers.
Key Features to Look For in a DIY Roofing Nailer
When you’re scanning the market for the best roofing nailer for DIY home roofing, focus on these critical features that will impact your experience:
- Weight: You’ll be holding this tool for extended periods, often overhead or at awkward angles. A lighter nailer (under 5 lbs is a good target for cordless) will significantly reduce fatigue.
- Ergonomics & Grip: A comfortable handle with a non-slip grip is essential for control and comfort, especially if you’re wearing gloves.
- Depth Adjustment: This is crucial for correctly setting the nail. You want nails to be flush with the shingle surface – not too deep (which can damage the shingle) and not too high (which leaves a point for water to enter). A tool that allows for easy, tool-free depth adjustment is ideal.
- Safety Features: Look for a “contact fire” or “bump fire” mode (which allows for rapid nailing when the trigger is held down and the nose touches the surface) combined with a safety tip. The safety tip prevents the nailer from firing unless it’s pressed firmly against the shingle. A lockout mechanism that prevents firing when the magazine is empty is also a good idea.
- Nail Capacity: How many nails can the magazine hold? A higher capacity means fewer interruptions to reload. For roofing, you typically use 1” to 1-1/4” nails specifically designed for asphalt shingles.
- Shingle Clearance: The nose of the nailer needs to fit comfortably under the overlap of shingles to drive the nail correctly in the designated nailing strip.
- Adjustable Rafter Hook: Not essential, but a very handy feature for hanging the nailer on a rafter when not in use, keeping it out of the way and preventing accidental drops.
- Durability & Build Quality: Even for DIY, you want a tool that feels solid and is built to last. Read reviews to see how well it holds up over time.
For DIY home roofing, the emphasis should be on ease of use, safety, and manageable weight. High-end pneumatic models designed for pros might be overkill and add unnecessary complexity.
Top Roofing Nailer Recommendations for DIYers
While specific models change, I can point you towards popular and well-regarded brands and types that consistently perform well for DIYers. When looking for the best roofing nailer for DIY home roofing, consider these factors:
For Cordless Enthusiasts (Highly Recommended for DIY):
Brands like Stanley FatMax, DEWALT, and Metabo HPT (formerly Hitachi) offer excellent battery-powered roofing nailers. These often use specialized battery platforms you might already own if you have other tools from these brands. They strike a great balance between power, convenience, and price for the DIY market.
For Budget-Conscious or Occasional Users:
If you’re on a tighter budget or only doing a tiny repair, a lighter-duty pneumatic nailer paired with a small, portable air compressor could be an option. However, the convenience and safety of cordless often outweigh the initial cost savings for a true DIY roofing project.
What to Expect in Terms of Cost:
- Cordless: Expect to pay anywhere from $200 to $400+, depending on the brand, included batteries, and features.
- Pneumatic (Nailer only): Can range from $100 to $300. You then need to factor in the cost of an air compressor ($150-$300+), hoses, and fittings.
- Electric: Typically under $100, but again, generally not recommended for full roofing projects.
Popular Cordless Roofing Nailer Features to Look For:
- Tool-free depth adjustment: Quick and easy to fine-tune nail depth.
- LED work light: Useful if you’re working in low-light conditions or on darker days.
- Battery indicator: See at a glance how much charge you have left.
- Swivel belt hook: For convenient hanging.
This table gives a quick overview of popular choices:
| Nailer Type | Pros | Cons | Ideal For |
|---|---|---|---|
| Cordless (Battery) | Ultimate freedom, easy setup, good for DIY. | Higher initial cost, batteries need charging. | Shed roofs, garages, small to medium house roofs, DIYers prioritizing convenience and safety. |
| Pneumatic (Air) | Powerful, fast, durable, potentially cheaper tool cost if compressor owned. | Requires compressor & hose, less portable, hose is a hazard. | Larger roofs, professionals, DIYers with existing compressor. |
| Electric (Corded) | Cheapest, simple power source. | Very limited mobility, safety hazard (cord), less power. | Very minor, occasional repairs only; not recommended for full roofing. |
How to Use a Roofing Nailer Safely (Critical for DIY!)
Safety is paramount when working with any power tool, and even more so when you’re on a roof or a ladder. Here’s a breakdown of how to use your roofing nailer safely:
- Read Your Manual: Seriously, every tool is slightly different. Understand your specific model’s controls, safety features, and maintenance requirements.
- Wear Proper PPE: This is non-negotiable.
- Safety Glasses: Always wear ANSI-approved safety glasses or a full face shield to protect your eyes from flying debris or nail fragments.
- Work Gloves: Protect your hands and improve grip.
- Sturdy Footwear: Ensure you have good traction, especially on a roof.
- Hard Hat: Recommended if there’s any risk of falling objects.
- Hearing Protection: Some nailers can be loud.
- Inspect the Tool and Workspace: Before every use, check the nailer for damage, ensure the magazine is clear, and make sure your work area is free of obstructions. If using a pneumatic nailer, check the hose for leaks.
- Maintain a Stable Stance: Ensure you have a solid footing, whether on a ladder, scaffolding, or the roof itself. Never overreach.
- Understand Contact Firing (Bump Fire): Most roofing nailers use a contact firing mechanism. This means the nailer will only fire when two conditions are met simultaneously: the trigger is depressed, AND the safety tip is pressed against the surface.
- Always keep your finger OFF the trigger when you are not actively driving a nail.
- Point the nailer away from yourself and others, especially when not in contact with a surface.
- Nail Direction: Always drive nails perpendicular to the shingle surface. Angle-driven nails can cause premature shingle failure or blow through the sheathing. The nose of the nailer should be flush with the shingle surface being nailed.
- Correct Nail Depth: Use the depth adjustment feature. The nail head should be flush with the surface of the shingle.
- Too shallow: The nail head will be exposed, creating a water leak point and potentially snagging.
- Too deep: The nail head can crush the shingle material, weakening it and causing a leak.
- Avoid Overdriving: Overdriving nails can break the shingle, causing immediate leaks. Pay attention to what the nailer is doing and adjust your pressure or depth setting as needed.
- Be Mindful of Others: Ensure no one is walking underneath the work area while you are nailing.
- Proper Storage: Store your nailer in a safe place when not in use. For cordless, remove the battery if storing for extended periods. For pneumatic, disconnect the air supply.
Understanding these points will help you use your tool effectively and, more importantly, keep you safe. For more detailed safety guidelines from a government perspective, you can always check out resources from organizations like the Occupational Safety and Health Administration (OSHA) regarding safe tool operation and working at heights.
The DIY Roofing Nailer Buyer’s Checklist
Here’s a quick checklist to run through when you’re ready to make your purchase. This will help you ensure you’re getting the tool that’s truly the best roofing nailer for DIY for your needs:
Before You Buy: Ask Yourself:
- What size is my roofing project? Small repair vs. whole roof.
- What’s my budget? Including potential accessories (batteries, charger, nails).
- Do I already own tools from a particular brand? (e.g., batteries, charger) This can save money if you buy from the same ecosystem.
- How important is portability and ease of setup?
- Am I comfortable managing an air compressor and hose?
Nailer Features to Verify:
- Power Source: Cordless, Pneumatic, Electric.
- Weight: Check specs, aim for <5 lbs for cordless.
- Ergonomics: Comfortable grip, good balance.
- Depth Adjustment: Easy, tool-free is best.
- Safety Mechanism: Contact fire with safety tip is standard and recommended.
- Nail Compatibility: What size and type of nails does it use? (Commonly 1” to 1-1/4” roofing nails). Ensure they are collated correctly (e.g., plastic collation, straight).
- Includes: Battery, charger, case (if applicable)?
- Warranty: Look for a decent manufacturer warranty.
Nails: Don’t Forget These!
- You’ll need specific roofing nails. For asphalt shingles, these are typically 1” to 1-1/4” long and made of galvanized steel to resist rust.
- Ensure the nails are collated at the correct angle (often 15 degrees) for your specific nailer model. Check your nailer’s