Quick Summary:
For narrow trim, the best tool is typically a brad nailer or a pin nailer. These lightweight, low-impulse nailers are designed for delicate materials, ensuring minimal damage, excellent holding power, and a nearly invisible finish, making them perfect for detailed work where precision is key.
Working with narrow trim can be a bit tricky. You want those clean, crisp lines, but you also don’t want to split the wood or leave big, unsightly holes. It’s a common challenge for DIYers, especially when you’re just starting out. The good news is, there’s a straightforward solution that will make your trim projects look like a pro did them. We’ll walk you through exactly what you need and how to use it, so you can tackle your next project with confidence.
Table of Contents
The Challenge of Nailing Narrow Trim
So, why is narrow trim so… well, narrow? Because it’s delicate! Think of the delicate moldings around your windows, the thin baseboards in older homes, or the intricate decorative pieces you might add to furniture or walls. These pieces are often only an inch or two wide, sometimes even less.
The main problem arises when you try to fasten them. Standard construction nailers, like framing nailers, are simply too powerful. They drive nails that are too large, and the force can easily:
- Split the wood: Especially true for softwoods or pre-finished trim.
- Damage the face: The sheer impact can dent or splinter the surface, ruining the aesthetic.
- Create oversized holes: Even if the wood doesn’t split, the nail head can be too prominent, requiring extensive filling and sanding to look good.
- Be difficult to control: The size and weight of larger nailers make precise placement on thin material a challenge.
You want a nail that holds firmly without announcing its presence. You’re aiming for invisible fasteners, a clean finish that lets the trim shine, not the hardware. This is where the right tool makes all the difference.
The Genius Solution: Brad Nailers and Pin Nailers
The heroes of the narrow trim world are the brad nailer and the pin nailer. These are specialized tools designed for lighter tasks than their framing or finishing nailer cousins. They drive smaller, thinner fasteners, and they do it with less force, making them ideal for delicate woodworking.
Let’s break down what makes them so effective and how they differ:
What is a Brad Nailer?
A brad nailer uses nails that are typically around 1/16 inch wide. These nails have a small head that is much less noticeable than a finish nail. Brad nails are great because they offer a good balance of holding power and minimal marring. They are perfect for trim that needs to stay put but doesn’t require the absolute invisibility of a pin nail.
Ideal Use Cases for Brad Nailers:
- Installing baseboards (especially narrower profiles).
- Attaching casing around doors and windows.
- Securing chair rails or crown molding.
- Crafting cabinets and furniture.
- Wainscoting.
Brad nailers come in various sizes, typically referred to by the gauge of the nail. Common gauges are 18-gauge (slightly thicker, more holding power) and 16-gauge (thicker still, used for heavier trim). For most narrow trim work, an 18-gauge brad nailer is your go-to.
What is a Pin Nailer?
A pin nailer is even more specialized for fine detail work. It uses nails (often called “pins”) that are incredibly thin – usually around 23 or 24 gauge. These pins have virtually no head at all, meaning they are almost completely invisible once driven into the wood.
Ideal Use Cases for Pin Nailers:
- Assembling very small or delicate wood projects.
- Attaching intricate trim pieces where even a brad nail head would be too noticeable.
- Temporary holding of pieces while glue dries (though they aren’t substitute for clamps for structural integrity).
- Crafting and model making.
- Working with very thin or soft woods.
The trade-off with pin nailers is holding power. Because the pins are so small and have no heads, they don’t offer much in terms of structural support. They are best used in conjunction with wood glue for most applications. The glue provides the strength, and the pin nailer holds everything in place while the glue cures.
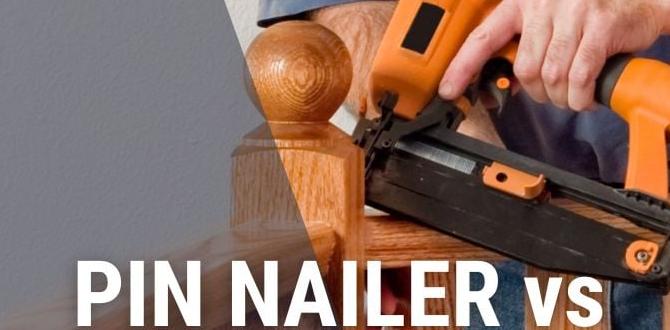
Key Differences: Brad Nailer vs. Pin Nailer
To help you choose, let’s look at a direct comparison:
| Feature | Brad Nailer | Pin Nailer |
|---|---|---|
| Nail Width (Gauge) | Typically 18-gauge (about 1mm thick) | Typically 23 or 24-gauge (about 0.5mm thick) |
| Nail Head Size | Small, subtle head | Virtually no head (headless) |
| Holding Power | Good to excellent for lightweight trim | Minimal; primarily for alignment and holding while glue dries |
| Visibilty of Fastener | Very low, easily filled | Nearly invisible |
| Project Suitability | Baseboards, casing, chair rails, furniture assembly | Intricate detail trim, small moldings, delicate crafts, holding during gluing |
| Marring of Wood | Minimal, especially with proper depth setting | Extremely minimal |
Choosing the Right Nailer for Your Project
For the general task of installing narrow trim like baseboards or window casing, an 18-gauge brad nailer is usually the sweet spot. It provides enough holding power to secure the trim firmly to the wall or studs, and the nail heads are small enough that they can be easily filled with wood putty for a seamless finish.
If you’re dealing with incredibly thin ornamental trim, replicating a historical look with very delicate features, or attaching tiny pieces for a craft project, a pin nailer becomes the star. Just remember that for structural applications, you’ll want to pair it with wood glue.
Power Source Options
Nailers come in several power source varieties. The best choice for you will depend on your workspace, budget, and preference.
- Corded Electric Nailers: These plug into a standard outlet. They are generally lighter and cheaper, but you’re tethered to a power cord, which can be a hassle.
- Cordless Battery-Powered (18V/20V MAX) Nailers: These are incredibly convenient. They use rechargeable batteries, offering freedom of movement. The battery technology has improved significantly, making them powerful and efficient for trim work. This is often the best all-around choice for DIYers.
- Pneumatic (Air-Powered) Nailers: These require an air compressor and a hose. They are typically the most powerful and have the least recoil. While favored by some professionals for consistent performance, the need for a compressor and hose can be cumbersome for smaller DIY jobs.
For narrow trim, especially if you’re moving around a lot, a cordless battery-powered brad nailer or pin nailer is hard to beat for convenience and performance.
What Nails to Use?
Always match the nailer to the correct nail size and type. Using the wrong nails can cause jams or damage the tool.
- For an 18-gauge brad nailer: Look for “18-gauge brad nails.” You’ll find them in various lengths, typically from 5/8 inch up to 2 inches. For narrow trim, you’ll likely want lengths between 1 inch and 1 1/4 inches, depending on the thickness of your trim and the wall material behind it.
- For a 23-gauge pin nailer: Look for “23-gauge headless pins.” These also come in different lengths, often from 1/2 inch up to 1 1/4 inches. For delicate trim, 5/8 inch to 3/4 inch is often sufficient.
You can find these nails at any major hardware store or online tool retailer. Consider brands like Senco, DeWalt, Bostitch, or Paslode for reliable fasteners.
How to Use a Brad Nailer or Pin Nailer on Narrow Trim (Step-by-Step)
Using these tools is generally straightforward, but a little prep and attention to detail go a long way. Safety is always the top priority!
Step 1: Gather Your Tools and Materials
Before you start, have everything ready. This includes:
- Your chosen brad nailer or pin nailer (charged battery or air hose connected).
- The correct nails/pins for your nailer.
- Safety glasses (non-negotiable!).
- Work gloves (optional, but recommended).
- The trim pieces you’ll be installing.
- Wood glue (especially if using a pin nailer).
- Measuring tape and pencil.
- Chop saw or miter saw for accurate cuts.
- Caulk and paint for finishing.
- A small amount of wood filler or putty.
Step 2: Safety First!
Always wear your safety glasses. Nailers can misfire, or small pieces of wood can fly off. Never point the nailer at yourself or anyone else. Ensure the nailer disengages from the trigger mechanism and the power source (unplug, remove battery, or disconnect air) if you need to adjust something.
Step 3: Prepare the Trim
Measure and cut your trim pieces precisely. For a professional look, use a miter saw for clean, angled cuts where pieces meet.
If you are using a pin nailer and wood glue for added strength, apply a thin, even bead of wood glue along the back edge of the trim piece that will contact the wall. Make sure not to use too much, as excess glue squeezing out can be messy.
Step 4: Position the Trim
Hold the trim piece firmly in place against the wall or surface where it belongs. Ensure it’s level and flush. If using glue, this is when you press it into place.
Step 5: Set the Depth of Your Nailer
Most nailers have an adjustable depth setting. This is CRUCIAL for narrow trim. You want the nail to drive just below the surface of the wood, slightly countersunk, but not so deep that it blows out the other side or creates a huge dent.
Quick Test: Find a scrap piece of the same trim material. Set your depth to a medium setting and drive a nail. Check if it’s flush or slightly countersunk. Adjust deeper or shallower as needed until you achieve that perfect, barely-there indentation.
For very narrow trim, slightly shallower might be better initially until you get a feel for it. You can always drive it a tiny bit deeper manually if needed.
Step 6: Nail the Trim
Place the tip of the nailer nozzle firmly against the trim. Ensure the nailer is flush and perpendicular to the wood surface. This is called “positioning the firing pin.”
Most nailers have a safety contact tip (sometimes called a “nose”) that must be pressed against the surface to fire. Press this contact tip firmly onto the trim.
Then, gently squeeze the trigger. The nail will be driven into the wood.
Spacing the Nails: For narrow trim, you don’t need nails every inch. Aim for one nail near each end of the trim piece, and then space others every 8-12 inches along the length. If the trim is very thin, consider staggering them slightly to avoid weakening the wood.
Where to Place Nails: For baseboards and casing, try to aim your nails into the framing studs or the wall structure behind the drywall if possible. This provides the best holding power. If you can’t hit a stud, the nails will at least go into the drywall, which is usually sufficient for lighter trim with the help of glue.
Step 7: Finishing Touches
Once all your trim pieces are nailed in place:
- Check for Stability: Gently try to wiggle each piece. If any feel loose, add another nail or two, or consider adding a touch of wood glue.
- Fill Holes: Use a good quality wood filler or putty that matches your trim color (or is stainable if you plan to stain). Lightly press the filler into each nail hole with your finger or a small putty knife.
- Sand (Optional): Once the filler is dry, you can very lightly sand the filled areas to make them perfectly smooth, if needed. Be careful not to sand the trim itself.
- Caulk: Apply a thin bead of paintable caulk along any gaps between the trim and the wall (or ceiling if it’s crown molding). This creates a clean, seamless transition.
- Paint: Now you’re ready to paint!
Tips for Working with Narrow Trim
Here are a few extra tips to make your narrow trim projects even more successful:
- Practice on Scrap: Before you start on your actual project, grab some scrap wood that’s similar in thickness and practice firing nails. Get a feel for the depth setting and how the tool performs.
- Don’t Over-Nail: It’s tempting to put a nail every few inches, but for narrow trim, this can weaken the wood. Space them reasonably, and let adequate glue coverage do some of the work if you’re using it.
- Adjust for Different Woods: Hardwoods might require slightly deeper settings or longer nails than softwoods.
- Nail into Studs When Possible: This provides the most secure installation, especially for baseboards. Use a stud finder to locate them. A well-placed nail into a stud makes a huge difference.
- Keep the Nailer Level: Hold the nailer perpendicular to the surface. Firing at an angle can cause nails to bend or not seat properly.
- Clean Your Nailer: Periodically check your nailer’s manual for maintenance tips. Keeping it clean and lubricated ensures it runs smoothly. For pneumatic nailers, check the air pressure and ensure it’s set correctly for the tool.
- Consider the Trim Type: If you’re working with very soft, thin veneers for trim, a pin nailer might be your only option to avoid damage. If it’s slightly more robust, an 18-gauge brad nailer will likely suffice.
When to Call in the Pros (or Just Reconsider)
While brad and pin nailers are fantastic tools, and installing trim is a very achievable DIY project, there are times when you might want to reconsider or get help:
- Very Old/Brittle Trim: If the trim is extremely fragile from age or previous damage, you could shatter it even with a pin nailer. Precision and a very gentle touch are needed.
- Complex Curves/Curves: If the trim needs to follow a very complex or tight curve, you might struggle to keep it flush against the wall while nailing. This can sometimes lead to gaps.
- Lack of Confidence: If you’re feeling overwhelmed or unsure about achieving a clean finish, it’s okay to hire a professional carpenter. Their experience can save you time and headaches, and the result will be worth it.
For most situations, though, an 18-gauge brad nailer or a 23-gauge pin nailer, combined with careful work, will give you excellent results.
Frequently Asked Questions (FAQ)
What is the smallest nailer I can use for very thin trim?
For extremely thin or delicate trim where virtually no nail head is acceptable, a 23-gauge pin nailer is the best choice. It drives headless pins that are almost invisible.
Can I use a finish nailer for narrow trim?
A finish nailer (typically 15 or 16-gauge) can sometimes be used for slightly wider trim (say, over 2 inches), but for truly narrow trim (like 1-inch to 1.5-inch profiles), the nail heads might still be too prominent. An 18-gauge brad nailer is usually a better fit for maximum subtlety.
How do I prevent the nailer from damaging the trim?
The key is to properly set the depth on your nailer at a shallow-to