Quick Summary:
A cordless battery nail gun is a game-changer for crown molding installation, offering freedom from air hoses and unmatched portability. With the right tips, even beginners can achieve professional, clean results safely and efficiently.
Installing crown molding can make any room feel more elegant and finished. But let’s be honest, wrestling with air compressors, tangled hoses, and power cords can be a real hassle. That’s where a battery nail gun steps in – it’s like a superhero for your DIY crown molding project! These cordless wonders give you the freedom to move around easily and nail precisely where you need to, without being tethered to anything. If you’ve been intimidated by crown molding or just want to make the job smoother, you’re in the right place. We’ll walk you through everything you need to know to use a battery nail gun like a pro, getting those perfect results you’ve been dreaming of.
Table of Contents
Why a Battery Nail Gun is Your Crown Molding Best Friend
You might be wondering, “Why a battery nail gun specifically for crown molding?” It’s a fair question! While other nailers can technically do the job, battery-powered models offer a unique set of advantages that make them ideal for this particular trim work. Think about the intricate angles and the need for precise placement, especially around corners and windows. A cordless nailer lets you get into those tight spots without a hose getting in the way or a cord limiting your reach. Plus, modern battery-powered nail guns are powerful enough to drive nails consistently, providing a secure hold for your beautiful molding.
The convenience factor is HUGE. Gone are the days of dragging an air compressor to every room, or worrying about tripping over hoses. A battery nail gun is self-contained, making setup a breeze and cleanup even faster. This means less time spent fiddling with equipment and more time focused on getting that perfect fit and finish.
Choosing the Right Battery Nail Gun for the Job
Not all battery nail guns are created equal, especially when it comes to handling delicate, yet sturdy, crown molding. Here’s what to look for:
- Nail Size Compatibility: For most crown molding, you’ll want a nail gun that accepts either 16-gauge or 18-gauge brad nails, typically between 1 to 2 inches long. 16-gauge nails offer a bit more holding power, which can be great for securing heavier molding profiles, while 18-gauge nails leave a smaller hole that’s easier to conceal.
- Power and Depth Adjustment: Ensure the nailer has enough power to drive nails flush with the molding without splitting the wood. A depth adjustment feature is crucial here. It allows you to fine-tune how deep the nail is driven, preventing over-penetration that can damage the molding or push nails too far through.
- Ergonomics and Weight: You’ll likely be holding this tool overhead for extended periods. A lightweight, well-balanced nail gun with a comfortable grip will significantly reduce fatigue and improve accuracy.
- Battery Life: Check the manufacturer’s claims for how many nails you can drive on a single charge. Having at least one spare battery is a smart move so you don’t have to halt your project to recharge.
- Sequential vs. Contact Fire Mode: Most modern nail guns offer both. Sequential fire (one nail at a time, requiring a trigger pull for each nail) offers precision, which is vital for crown molding. Contact fire (nailing as you press the nose of the gun against the surface) is faster but less precise and should be used with caution.
Essential Tools and Materials
Beyond your battery nail gun, here’s a checklist of other items you’ll need for a successful crown molding installation:
Tools:
- Battery Nail Gun (pre-loaded with appropriate nails)
- Miter Saw (essential for accurate angle cuts)
- Measuring Tape
- Pencil
- Stud Finder
- Safety Glasses (non-negotiable!)
- Hearing Protection
- Work Gloves
- Caulk Gun
- Utility Knife
- Wood Filler
- Sandpaper (various grits)
- Optional: Ladder or Scaffolding for high ceilings
Materials:
- Crown Molding (calculate length needed plus 10-15% for waste)
- Nails (16-gauge or 18-gauge brad nails, appropriate length for your molding thickness)
- Wood Glue (for strong corner joints)
- Paint or Stain (to finish the molding)
- Primer (if painting)
- Caulk (paintable)
- Wood Filler
Step-by-Step Crown Molding Installation with Your Battery Nail Gun
Let’s get to the fun part! Follow these steps to install your crown molding like a seasoned pro using your cordless nailer.
-
Plan Your Layout and Measure
Before you make any cuts, it’s wise to have a solid plan. Measure the length of each wall where the molding will be installed. Add about 10-15% to your total measurement to account for potential mistakes, saw kerfs (the width of the saw blade cut), and tricky corner cuts. This ensures you won’t run short mid-project.
Pro Tip: For crown molding, always measure along the wall, not at the widest point of the molding itself. This is because the molding sits at an angle against the wall and ceiling.
-
Prepare the Wall Surface
Ensure the wall and ceiling surfaces where the molding will attach are clean and free of debris. Gently sand any rough spots if needed. Use a stud finder to locate wall studs along the length of the wall where you plan to install the molding. Mark these stud locations lightly with a pencil. This is crucial because you’ll need to nail into the studs for a secure, long-lasting installation. Also, mark the top edge of where the molding will sit on the ceiling and the wall.
For more detailed information on locating studs safely, you can refer to resources like The Governor’s Office of Energy Management and Conservation, which provides sound advice applicable to any home.
-
Mastering Your Miter Saw for Crown Molding
This is where the magic of precise cuts happens. Crown molding is typically installed with “spring angle” cuts, meaning it rests against the ceiling and the wall at an angle. Setting up your miter saw for these cuts can seem daunting, but it’s manageable:
- Standard Inside/Outside Corners: Most crown molding has a specific “profile” that dictates its spring angle. Common angles are 38 degrees, 45 degrees, or 52 degrees. You’ll need to set your miter saw to these corresponding angles for your cuts.
- Cutting Insides Corners: For an inside corner, you’ll typically set your miter saw to a 45-degree angle (for a standard 90-degree corner). When cutting, the molding is inverted – meaning the wide face sits flat against the saw base, and the edge rests against the saw’s fence. The trick is to have the molding “crowning” (the widest part facing upwards) as it will appear on the wall.
- Cutting Outside Corners: Similar to inside corners, set your miter saw to the appropriate angle (often 45 degrees). Again, the molding is inverted. The key is to ensure that the two pieces, when joined, create a clean, tight seam.
- Test Cuts: Always make test cuts on scrap pieces of molding first! This allows you to check the fit in a corner before cutting your good material. You’re aiming for a snug fit with no gaps.
Important Note: Some people prefer to set their miter saw to the “90-degree” detent and adjust the bevel angle instead of the miter angle. For example, for a 45-degree spring angle molding, you might set the miter to 0 degrees and the bevel to 45 degrees. The exact settings can depend on your saw and molding profile. Always consult your saw’s manual and do a few test cuts!
-
Installing the First Piece
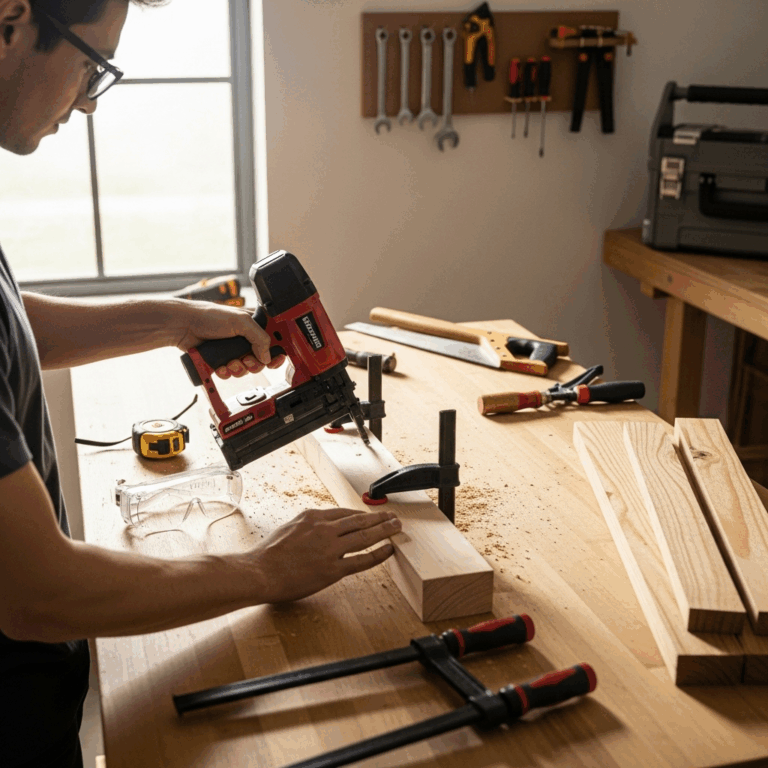
Start with a straight run of molding. Place the first piece against the ceiling and wall, ensuring its top edge aligns with your pencil line and it’s seated firmly against the wall and ceiling. Hold it securely in place.
Now, grab your battery nail gun. Aim it so the nozzle is perpendicular to the molding. Position the nose of the nailer against the lip of the molding. Fire your first nail into the molding, ensuring it penetrates into a marked stud. You’ll want to sink nails about every 16-24 inches along the length of the molding, and also into any studs you’ve marked near the ends of the piece.
Depth Adjustment is Key: Use the depth adjustment feature on your nail gun. You want the nail head to be slightly below the surface of the molding (a “dimple”) so it can be easily concealed with wood filler or caulk. If the nail is too proud, it will be difficult to fill. If it’s sunk too deep, it can split the molding or make a large, unsightly hole.
-
Nailing into Studs and Solid Connections
As mentioned, hitting studs is crucial for a secure installation. When you’re nailing, aim your nails to pierce through the molding and into the framing behind it. Look for those pencil marks you made earlier. Use the stud finder again if you’re unsure. A well-nailed piece of molding won’t sag or pull away over time.
For longer runs, consider adding a few nails into the ceiling and wall where there isn’t a stud, but do so carefully. A battery nail gun’s depth adjustment is invaluable here to avoid over-penetrating the drywall.
For strong corner joints: Before nailing your cut pieces together at a corner, apply a small amount of wood glue to the mitered edges. This creates a much stronger bond than nails alone and helps prevent the corner from separating over time.
-
Dealing with Complex Corners and Transitions
Inside and outside corners are often the trickiest parts. After carefully cutting your mitered pieces, dry-fit them first to ensure a tight seam. If you have small gaps:
- Small Gaps (less than 1/16 inch): These can often be handled with paintable caulk after the molding is installed and painted.
- Larger Gaps: These usually indicate an issue with your corner angle cut. Go back and re-cut your molding pieces, or try a slightly different miter or bevel angle on your saw and test again on scrap. Patience here pays off!
Nailing Corners: When nailing corner pieces, use your nail gun to drive nails through the molding and into the wall studs behind it whenever possible. For pieces that might not align perfectly with a stud, still use your nail gun to drive nails at an angle, but be very careful with depth. Small, angled nails here can sometimes be easier to hide.
-
Finishing Touches: Filling and Caulking
Once all your molding is up and securely nailed:
- Fill Nail Holes: Use a good quality wood filler or putty to fill all the nail holes. For a smooth finish, try to slightly overfill the hole and then, once the filler has dried according to its instructions, sand it flush with the molding surface.
- Sand Smooth: Lightly sand any rough spots or dried glue squeeze-out until the molding is smooth to the touch.
- Caulk Seams: Apply a bead of paintable caulk along the top edge where the molding meets the ceiling, and along the side edges where it meets the wall. Run your finger (or a caulk-smoothing tool) along the bead to create a clean, professional-looking seal. This hides any minor imperfections and creates a seamless transition.
-
Priming and Painting
If you’re painting your molding, now is the time to prime. Apply a good quality primer and let it dry completely. Follow up with one or two coats of your chosen paint color. For a professional finish, use a high-quality brush and paint. Ensure the paint is fully dry before enjoying your beautifully transformed room!
Consider using a fine-tip caulk gun for applying caulk to small gaps. This offers more control than a standard caulk gun and can help you achieve cleaner lines.
Battery Nail Gun vs. Other Nailer Types for Crown Molding
To really appreciate the battery nail gun, let’s see how it stacks up against its counterparts for crown molding jobs.
| Nailer Type | Pros for Crown Molding | Cons for Crown Molding | Beginner Friendliness |
|---|---|---|---|
| Battery Nail Gun | Excellent portability, no air hose, easy to maneuver in tight spots, quick setup and takedown. Modern ones are powerful. | Higher upfront cost, battery needs charging, can be slightly heavier than pneumatic. | Very High – minimal setup and intuitive operation. |
| Pneumatic (Air) Nail Gun | Powerful, consistent nailing, generally lighter tool body, lower tool cost. | Requires air compressor and hose, limiting mobility and setup/takedown time. Hose can be cumbersome. | High – but tethered by hose and compressor. |
| Gas-Powered Nail Gun | Cordless, powerful. | Uses fuel cells (can be expensive), can emit fumes, requires good ventilation, can be noisy. | Moderate – requires fuel management and ventilation. |
| Hammer and Finish Nails | Lowest cost of tools, very simple. | Extremely time-consuming, high risk of hammer marks or splitting molding, difficult to get consistent depth, very labor-intensive. | Low for professional results – high risk of aesthetic errors. |
As you can see, for DIYers prioritizing ease of use, portability, and a quick setup, the battery nail gun really shines for crown molding. The investment often pays off in saved time and reduced hassle.
Genius Tips for Perfect Crown Molding Installation
Here are a few extra secrets to make your battery nail gun crown molding project even more successful:
- Pre-Drilling for Stubborn Wood: While battery nail guns are powerful, some very dense woods or exceptionally hard knots can still cause nails to bend or not drive flush. If you encounter this, a quick pre-drilled pilot hole (smaller than the nail shaft) can make a world of difference. Just be sure to use a bit slightly narrower than your nail.
- “Walking” Your Nailer: When nailing into a stud, you can “walk” your nailer along the stud, firing nails into it every few inches. This ensures solid support and a firm hold.
- Practice on Scrap: Before you cut and install your first piece on the wall, grab a few lengths of your molding and your battery nail gun. Practice making cuts and firing nails into scrap pieces. Get a feel for the depth adjustment, the trigger control, and how the nails penetrate. This will build your confidence immensely.
- The Power of Glue: Never underestimate the power of wood glue, especially on mitered corner joints. It adds a significant amount of strength and longevity to your installation, preventing unsightly gaps from appearing years down the line.
- Caulk as Your Best Friend: Even the most perfectly cut molding can have tiny imperfections. Paintable caulk is your secret weapon for achieving a seamless, professional look. Focus on creating a clean, consistent bead along the ceiling and wall lines.
- Working Overhead Safely: When working above your head, especially on ladders or scaffolding, always be mindful of your balance and ensure the ladder is stable. Keep your work area clear of tripping hazards. Battery nailers, being cordless, reduce one common tripping hazard (the hose) but awareness is still key. For more on ladder safety, consult resources like those from OSHA (Occupational Safety and Health Administration).
- Consider a Second Battery: If your project is large or you’re working on multiple rooms, having a spare charged battery ready to go can save you significant downtime. It’s a small investment that keeps your momentum going.
- Don’t Rush the Cuts: The majority of issues with crown molding installation come down to the miter cuts. Take your time, double-check your angles, and make test cuts on