An angled finish nailer is a power tool that drives slim finishing nails at a specific angle, making it perfect for tight spots and trim work where a straight nailer can’t reach. It’s a game-changer for DIYers tackling projects like installing baseboards, crown molding, and window casings with ease and a professional finish.
Ever stared at that tricky corner trim or a tight space between cabinets and wondered how to get a nail in there without making a mess? It’s a common DIY headache! You want your projects to look sharp and professional, but sometimes the tools just don’t cooperate. That’s exactly where the magic of an angled finish nailer comes in. This clever tool is designed to help you conquer those awkward angles and tight squeezes, making your woodworking and home improvement tasks smoother and your results far more impressive. Get ready to say goodbye to frustration and hello to perfectly placed nails!
Table of Contents
Jack Shaffer’s Nailerguy Guide: Understanding the Angled Finish Nailer
Hey there, fellow builders and DIY enthusiasts! Jack Shaffer here, your go-to guy for all things nailers. Today, we’re diving deep into a tool that has seriously revolutionized my woodworking – the angled finish nailer. If you’ve ever struggled to get nails into tight spaces or felt limited by your tool’s reach, you’re going to love this. We’ll break down exactly what it is, why it’s such a superstar, and how it can make your next project a breeze.
Think of a traditional finish nailer. It’s great for many jobs, but what happens when you face a corner that’s just too snug? Or lining up trim along a door frame that requires a nail to go in at an angle? That’s where the angled finish nailer shines. Its genius lies in its magazine – the part that holds the nails – which is set at an angle, typically 15 or 20 degrees. This simple design change opens up a world of possibilities for where and how you can drive nails.
This guide is all about demystifying the angled finish nailer. We’ll cover everything from its basic anatomy to its most common uses, helping you understand if it’s the right tool for your DIY toolkit. Ready to level up your nailing game?
What Exactly IS an Angled Finish Nailer?
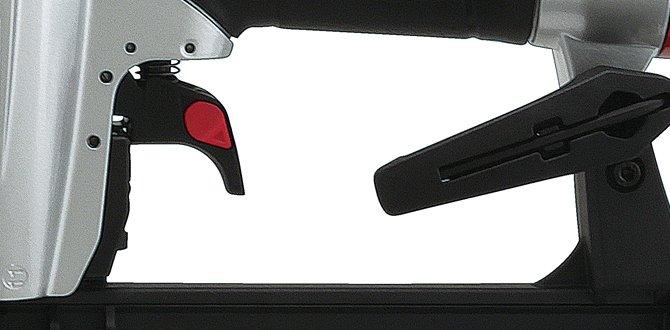
At its core, an angled finish nailer is a power tool designed to quickly and precisely drive finishing nails into wood. What sets it apart is the angled magazine. Instead of the nails lying flat, they are held in a strip that’s tilted relative to the tool’s body.
This tilt is the key feature. It allows the nailer’s nose to reach into corners, around curves, and into tight spaces where a straight nailer would simply hit the adjacent surface before it could fire a nail. The angle is usually either 15 or 20 degrees, and this slight deviation makes a huge difference.
Key Components of an Angled Finish Nailer
While it looks similar to a straight finish nailer from afar, understanding its parts helps appreciate its function:
- Angled Magazine: This is the star of the show. It holds the strip of finishing nails at an angle.
- Nose: The tip of the tool where the nail is driven. The angled magazine dictates how the nose interacts with the work surface.
- Trigger: Activates the firing mechanism. Most have safety triggers that require pressing the nose against the wood first.
- Air Hoses/Battery: Depending on the type (pneumatic, cordless, or electric), it requires either an air compressor and hose or a battery pack for power.
- Depth Adjustment Dial: Lets you control how deep the nail is driven into the wood, crucial for hiding nails or ensuring they sit flush.
Nail Sizes and Types
Angled finish nailers use specialized finishing nails. These are slimmer than framing nails, meaning they leave a much smaller hole that’s easier to fill and hide. This is why they’re perfect for visible trim work where you want a clean look. The nails are typically held together in strips, often glued or paper-collated, which fit into the angled magazine.
Common nail gauges for angled finish nailers include 15-gauge (often called “pro” or “finner” nails) and 16-gauge (“finish” or “brad” nails). A 15-gauge nail is slightly thicker than a 16-gauge nail, offering a bit more holding power. The choice often depends on the specific project and the desired level of visibility for the nail head.
Why Choose an Angled Finish Nailer? The Genius Behind the Angle
So, what makes this angled design so brilliant? It’s all about accessibility and versatility. Imagine you’re installing crown molding. The gap between the wall and the ceiling can be tight, and you need to nail the molding securely. A straight nailer might get blocked by the ceiling, forcing you to use a hammer or hand-nail, which is time-consuming and less accurate. The angled nailer lets you get into that crevice at an appropriate angle.
This tool expands your ability to work in places that were previously difficult or impossible with conventional nailers. It’s not just for corners, either. Think about attaching chair rails, adding decorative trim to furniture, or even working on the interior of cabinets. Any situation where you need to drive a nail from an angle to avoid hitting another surface or to get good purchase is where the angled nailer excels.
Pros of Using an Angled Finish Nailer
Let’s break down the advantages. These are the reasons why many woodworkers and DIYers consider this tool indispensable:
- Access to Tight Spaces: This is the primary benefit. The angled magazine allows you to drive nails into corners, irregular surfaces, and tight spots that a straight nailer cannot reach.
- Versatility for Trim Work: Ideal for installing baseboards, crown molding, window and door casings, chair rails, and other decorative trim where angles are unavoidable.
- Reduced Wood Damage: Finishing nails are slim, meaning smaller holes. This significantly reduces the chance of splitting delicate wood and makes filling and finishing much easier.
- Speed and Efficiency: Power nailing is significantly faster and more efficient than hand-nailing, especially for projects with many fasteners.
- Professional Results: The ability to place nails precisely and drive them to the correct depth consistently leads to a cleaner, more professional-looking finish.
- Easier Hardwood Application: While still requiring care, power nailing can make it easier to drive nails into harder woods compared to struggling with a hammer.
When a Straight Finish Nailer Might Be Better
It’s important to note that an angled finish nailer isn’t always the only tool you need. For wide, flat surfaces where access isn’t an issue, a straight finish nailer can be just as effective, and sometimes the magazines are slightly more compact.
Here’s a quick comparison:
| Feature | Angled Finish Nailer | Straight Finish Nailer |
|---|---|---|
| Magazine Angle | 15 or 20 degrees | 0 degrees (straight) |
| Best For | Corners, tight spots, trim work with complex angles | Flat surfaces, general finish carpentry, where space isn’t a constraint |
| Reach Limitations | Can reach into tighter areas | Limited reach in confined spaces due to magazine placement |
| Nail Visibility | Similar to straight, depends on depth control | Similar to angled, depends on depth control |
Types of Angled Finish Nailers: Powering Your Projects
Just like their straight counterparts, angled finish nailers come in a few different power sources. Your choice will depend on your existing tools, power availability, and personal preference. Let’s look at the main types:
1. Pneumatic Angled Finish Nailers
These are the classic workhorses. They require an air compressor and an air hose to operate. They are generally lighter, more powerful, and less expensive upfront for the tool itself.
- Pros: Lightweight, high power, reliable, typically lower initial cost.
- Cons: Requires an air compressor, hose can be cumbersome, needs to be tethered to power.
- Best For: Regular and extensive use, workshops, users who already own a compressor.
2. Cordless Angled Finish Nailers (Battery-Powered)
These are fantastic for portability and convenience. They run on rechargeable battery packs, meaning no hoses or compressors are needed. Modern cordless nailers offer excellent power and performance.
- Pros: Ultimate portability, no trip hazards, quick setup, great for on-site work.
- Cons: Heavier than pneumatic due to battery, higher initial cost, battery life is a consideration.
- Best For: Mobile users, DIYers who value convenience, frequent use in various locations.
3. Electric/Plumbed Angled Finish Nailers (Less Common)
While less common for angled finish nailers compared to straight models, some “electric” versions exist. These might plug directly into an outlet or require a specific, smaller air system. For most users, the choice boils down to pneumatic or cordless.
Getting Started: How to Use Your Angled Finish Nailer Safely and Effectively
Using any power tool comes with responsibility. Safety first, always! But using your angled finish nailer effectively is also about technique. Let’s walk through it.
Safety First! Essential Precautions
These steps are non-negotiable for a safe experience. Treat your nailer with respect.
- Read the Manual: Every tool is slightly different. Your owner’s manual is your best friend.
- Wear Safety Glasses: Essential to protect your eyes from flying debris or ricocheting nails.
- Wear Hearing Protection: Nailers can be loud; protect your hearing during prolonged use.
- Keep Fingers Away from the Nose: Never place your fingers near the firing area.
- Understand the Trigger Lock: Most nailers have a safety mechanism. Ensure it’s engaged when not in use or when moving.
- Never “Dry Fire”: Firing the nailer without it being pressed against a surface can damage the tool.
- Point Away from People: Always ensure the nailer is pointed in a safe direction when not in use or when loading nails.
- Secure Your Workpiece: Make sure the material you are nailing into is stable.
Step-by-Step: Driving Nails Like a Pro
Here’s how to get those nails where you want them:
- Connect Power: For pneumatic, connect your air hose (ensure the compressor is set to the recommended PSI, usually found in the manual). For cordless, ensure the battery is charged and inserted.
- Load Nails: Open the magazine (usually by sliding a mechanism) and load the correct size and type of finishing nails. Ensure they are seated correctly with the heads facing the driver blade. Close the magazine securely.
- Adjust Depth: Most nailers have a depth adjustment dial near the nose. Set it to a lower depth initially. You’ll test this on a scrap piece of wood.
- Test on Scrap: Place the nose of the nailer against a piece of scrap wood of the same type you’ll be working on. Squeeze the trigger. Check the nail depth. If it’s too deep, turn the dial so it protrudes more. If it’s too shallow, turn the dial so the nail sinks deeper. Repeat until you’re satisfied.
- Position the Nailer: For tight spots, place the nose of the nailer at the desired angle against your workpiece. Ensure the magazine is not pressing against another surface that would prevent the nail from being driven.
- Fire the Nail: Press the nose of the nailer firmly against the wood. This usually engages the safety contact tip. Then, squeeze the trigger. A nail should be driven into the wood.
- Work Systematically: For trim, start at one end and work your way along, placing nails at consistent intervals (e.g., every 16-24 inches, depending on the trim’s stability and purpose).
- Finishing Up: Once all nails are driven, you can often sink them slightly below the wood surface using the depth adjustment for easier filling.
Tips for Tackling Tricky Angles
The angled magazine is your secret weapon here. When you encounter an angle:
- Angle the Nailer: Position the nailer so the nose can get to the desired spot. The angle of the nailer’s magazine will help guide the nail in.
- Recess the Nose: Sometimes you can slightly recess the nose of the nailer into the trim piece itself to get closer.
- Consider Nail Placement: Think about where the nail needs to go for the best hold. Often, driving it at an angle into a stud from trim is more secure than trying to drive it straight into a thin board without backing.
- Use the Right Nails: Ensure your nails are long enough to penetrate the trim and at least 3/4 inch into the underlying material (like a stud or framing). For example, a 2-inch nail in 3/4-inch trim needs to go 1 1/4 inches into the backing material.
Common Projects for Your Angled Finish Nailer
The versatility of this tool means it’s ready for a wide range of projects around your home. Here are some of the most popular and effective uses:
1. Interior Trim Work
This is where the angled finish nailer truly shines. It’s almost indispensable for:
- Baseboards: Getting into the corners and around doorways can be challenging.
- Crown Molding: The tight wedge between walls and ceilings requires precise angle nailing.
- Window and Door Casings: Often require angled shots to secure them properly to the frame.
- Chair Rails and Picture Rails: Installing these precisely and securely is a breeze.
- Wainscoting: Whether it’s flat panels or decorative molding, the angled nailer ensures a clean finish.
Deck and Exterior Projects (Use Appropriate Nails)
While primarily for interior trim, some builders use angled finish nailers for certain exterior applications, such as attaching decorative trim or lattice. Ensure you use exterior-grade, galvanized, or stainless steel nails specifically designed for outdoor use to prevent rust and corrosion. Even then, for structural exterior work, a framing nailer is more appropriate. Always check manufacturer recommendations for which nails are suitable for exterior environments. For guidance on outdoor wood treatments and durability, resources like those from the Forest Products Laboratory can be very informative on wood properties and longevity.
2. Furniture Building and Refinishing
If you’re into building custom furniture or even just repairing/refinishing existing pieces, the angled nailer is fantastic for:
- Attaching decorative trim to furniture pieces.
- Securing drawer fronts or panels where access is limited.
- Reinforcing joints where a small, hidden nail is beneficial.
3. Cabinet Installation
When installing pre-fabricated cabinets or building custom cabinetry, the ability to nail into tight spots is invaluable. You might need to secure a cabinet to adjacent cabinetry, or attach a toe kick discreetly.
Choosing the Right Nails for Your Angled Finish Nailer
Using the correct nails is just as important as using the nailer correctly. The wrong nails can cause jams, damage your tool, or ruin your project.
Nail Gauge Matters: 15 vs. 16 Gauge
As mentioned before, the most common gauges are 15 and 16. Here’s a quick breakdown:
- 16-Gauge (Finish Nails): These are thinner, meaning they leave a smaller, less noticeable hole. They are excellent for delicate trim and applications where the nail head needs to be easily concealed. They offer good holding power for trim but can be more prone to splitting very thin wood compared to a 15-gauge nail.
- 15-Gauge (Finner/Pro Nails): These are slightly thicker. They provide a bit more holding power and are less likely to split wood than a 16-gauge nail. The nail head is also slightly larger, making them a touch more visible. They are a great all-around choice for most trim jobs.
Nail Length
The length of your nail determines how deeply it penetrates. A good rule of thumb for trim work is to have the nail long enough to go through the trim material and penetrate the backing material (stud, framing, etc.) by at least 3/4 inch. For example,