Mastering nail gun depth control is key to professional-looking projects. Learn simple, genius tips to adjust your nail gun’s depth setting for perfect nail placement every time, preventing over-driven or proud nails. Get it right with clear, actionable advice.
Hey there, DIY warriors and fellow woodworking enthusiasts! Jack Shaffer here from Nailerguy, your go-to source for all things nail guns and DIY. Ever find yourself staring at a nail gun, feeling a little… intimidated by that little dial or slider? You’re not alone! Getting the nail depth just right can feel like a puzzle. Too deep, and you’re damaging your wood. Not deep enough, and your nails are sticking out like a sore thumb. It’s a common frustration that can really slow down your projects and make your finished work look less than stellar. But don’t worry, getting this sorted is easier than you think! We’re going to break down exactly how to adjust your nail gun’s depth control, like a pro. Stick with me, and you’ll be driving nails with precision and confidence in no time. We’ll cover everything you need to know, from understanding what the depth control does to troubleshooting common issues.
Table of Contents
Why Nail Depth Control Matters (More Than You Think!)
Alright, let’s dig into why this seemingly small adjustment is a big deal for your woodworking projects. Proper nail depth isn’t just about aesthetics; it’s crucial for the structural integrity and overall quality of your work. When a nail is set too deep, it can:
- Damage the wood: You might splinter the wood surface, creating unsightly marks that are hard to fix, especially in hardwoods.
- Weaken the joint: If you drive the nail too far into softer material or leave it exposed, it won’t hold as securely.
- Make finishing difficult: Trying to fill a hole that’s too deep or sand down an imprecisely driven nail adds extra, time-consuming steps to your finishing process.
On the flip side, when nails are driven just right, they offer:
- A clean, flush finish: The nail head sits perfectly with the surface of the wood, ready for paint, stain, or leaving as-is.
- Stronger joints: The nail is fully engaged in both pieces of material, providing maximum holding power.
- Easier finishing: Minimal or no extra work is needed to make the nail heads disappear or blend in.
Understanding how to control this depth is your first step towards achieving those professional-looking results you’ve been aiming for. It’s a skill that pays off on every single project, from building a simple bookshelf to intricate trim work.
Understanding Your Nail Gun’s Depth Adjustment Mechanism
Before we start turning dials, let’s talk about how these depth adjustments actually work. While the exact mechanism can vary slightly between brands and types of nail guns (framing nailers, finish nailers, brad nailers, etc.), the core principle remains the same. Most nail guns use one of a few common methods:
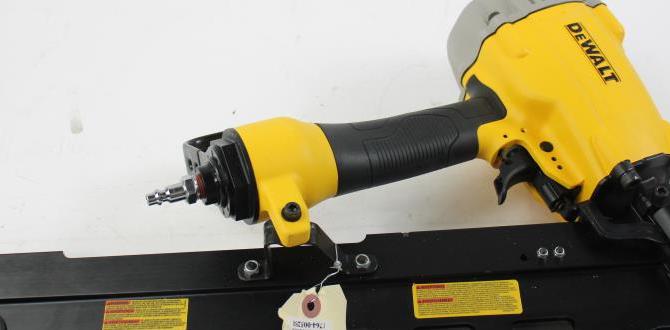
1. The Rotating Wheel or Thumbwheel
This is one of the most common and user-friendly methods. You’ll typically find a small wheel or disc located near the nose of the nail gun or on the handle. Rotating this wheel in one direction (often marked with “+” or “–” symbols, or simply indicated by the direction of the mechanism) will adjust the depth. Turning it one way will drive nails deeper, and turning it the other way will make them sit more proudly on the surface.
2. The Sliding Lever or Knob
Some nail guns feature a small lever or a knob that you slide or twist. This mechanism directly controls the depth by altering the distance the driver blade travels. Again, look for markings that indicate deeper or shallower settings. These are usually quite intuitive to operate.
3. The Sequential Depth Adjustment System
More advanced or specialized nail guns might have a slightly more complex system, sometimes involving a combination of settings for different material densities or fastener types. However, for the vast majority of beginner and intermediate users, you’ll be dealing with one of the simpler methods mentioned above. If you’re unsure, your nail gun’s manual is always your best friend. You can usually find digital copies on the manufacturer’s website if you’ve misplaced the paper version.
4. The “No-Tool” Depth Adjustment Feature
Many modern nail guns are designed for quick, tool-free adjustments. This is typically achieved through the rotating wheel or sliding lever method. The key takeaway is that you shouldn’t need any extra tools like screwdrivers or wrenches to make these adjustments. It’s all built right into the gun for your convenience!
The Step-by-Step Guide: How to Adjust Nail Gun Depth Control
Now for the part you’ve been waiting for! Adjusting the depth control is a straightforward process, but it requires a little trial and error to get it perfect. Here’s your go-to guide:
Step 1: Safety First, Always!
Before you touch anything, make sure your nail gun is safe to handle.
- Disconnect the air supply (if it’s pneumatic) or remove the battery (if it’s cordless).
- Remove any nails from the magazine.
- Point the gun away from yourself and others.
- Ensure you are wearing your required personal protective equipment (PPE), including safety glasses or goggles.
Safety is non-negotiable in any woodworking task, and operating a nail gun is no exception.
Step 2: Identify Your Depth Adjustment
Locate the depth adjustment mechanism on your specific nail gun. Refer back to the previous section or consult your owner’s manual if you’re having trouble finding it. Remember, it’s usually a wheel, slider, or knob.
Step 3: Prepare Your Test Materials
You’ll need scrap pieces of the same material you’ll be working with for your project. For example, if you’re working with 3/4-inch pine for trim, grab a few scraps of 3/4-inch pine. It’s also a good idea to have a scrap piece of the material the nail will be driven into as well. This is crucial because the density and thickness of both materials will affect how the nail drives.
Step 4: Make Your First Adjustment
Start with a mid-range setting on your depth adjustment. If your adjustment has markings like “+” and “-“, start roughly in the middle. If it’s a numbered system, a setting of “3” or “4” is often a good starting point. The goal is to make a small adjustment and then test.
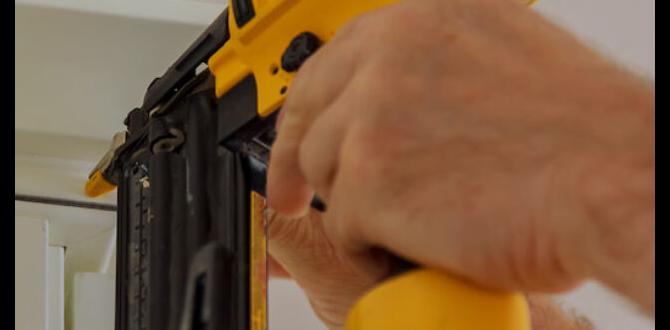
Step 5: Fire a Test Nail
With your safety gear on and the gun pointed at your test material, fire a single nail. Actuate the trigger firmly and hold the gun perpendicular to the surface. Make sure you are applying firm, consistent pressure—sometimes referred to as “nipple flush” or firm contact.
Step 6: Inspect the Nail Depth
Examine the nail you just fired.
- Is it too deep? The nail head is sunk too far into the wood, potentially causing splintering or damage. You’ll need to adjust the depth control to make the nail sit shallower.
- Is it too shallow? The nail head is sticking out proud of the wood surface. You’ll need to adjust the depth control to make the nail sink deeper.
- Is it just right? The nail head is flush or slightly below the surface of the wood, creating a clean finish.
You’re looking for a slight dimple, or for the nail head to be perfectly flush with the surface.
Step 7: Fine-Tune the Adjustment
Based on your inspection, make a small adjustment to the depth control. If the nail was too deep, adjust towards the “shallower” setting. If it was too shallow, adjust towards the “deeper” setting. Again, make small, incremental changes. It’s much easier to make a couple of small adjustments than one giant one.
Step 8: Repeat and Test
Fire another test nail. Inspect it. Continue this process of adjusting, firing, and inspecting until you achieve the perfect depth. Don’t be afraid to fire several test nails; this is the most effective way to dial in the setting for your specific tool and materials.
Step 9: Consider Material Properties
Remember that different wood species and thicknesses will react differently. Softer woods might require a shallower setting, while denser hardwoods might need a deeper setting to achieve the same result. Always test on the actual material you’ll be using for your project. Plywood, MDF, and solid wood can all behave differently.
Genius Tips for Perfect Nail Depth Control
Beyond the basic steps, here are some pro tips that seasoned woodworkers swear by to get that perfect nail depth every single time:
Tip 1: The “Nipple Flush” or Firm Contact Technique
This is probably the most important tip! When firing the nail, apply firm and consistent pressure to the work surface. Imagine you’re pressing the nose of the nail gun firmly against the wood, so much so that the “nipple” or contact tip of the gun is completely flush with the surface. This ensures consistent actuation of the safety contact tip (the part that depresses before firing) and consistent depth. A light touch will result in inconsistent nail depths.
Tip 2: Understand Your Nailer’s Power Settings (If Applicable)
Some pneumatic nailers have a regulator that controls the air pressure. While this isn’t directly the depth control, higher air pressure can drive nails deeper and with more force. For cordless or electric nailers, there might be power settings or modes. Ensure these are set appropriately for your material. Never set your air pressure (or power setting) so high that you can’t control the nail depth using the depth adjustment alone. Lower pressure is often better for fine finishing work.
Tip 3: Gauge the Softness/Hardness of Your Wood
As mentioned before, wood density is a huge factor. A nail gun set perfectly for pine might drive nails too deep into a soft poplar or too shallow into a dense oak. Always, always test on a scrap piece that mimics the project material. This saves you from damaging your actual project pieces.
Tip 4: Consider the Nail Type and Length
Different types of nails (brads, finish nails, brads with heads, headless brads) and different lengths will also affect how they sit. A longer nail driven into a thicker piece of wood has more material to penetrate, which can influence the resulting depth. Your depth control needs to compensate for these variations. A nail gun that’s perfect for 1.5-inch finish nails might need retuning for 2.5-inch nails.
Tip 5: Keep the Nose Clean
Sawdust and debris can accumulate around the nose of your nail gun, especially around the safety contact tip. This buildup can interfere with the proper functioning of the safety tip and the depth adjustment, leading to inconsistent results. Regularly clean the nose of your nail gun with a soft cloth or compressed air. For more detailed cleaning, consult your manual.
Tip 6: Account for Material Thickness
If you’re nailing into a very thin piece of material (like 1/4-inch plywood), the nail might blow through the other side if your depth is set too deep. Conversely, if you’re nailing into thick stock, you need enough depth to ensure the nail is securely anchored. Always think about both the material you’re nailing into and the material the nail is passing through.*
Tip 7: The “One and Done” Test Nail
Once you think you have the depth setting just right, fire one more test nail, then inspect it carefully. If it’s perfect, you can proceed with confidence. If it’s slightly off, make a final tiny adjustment. This final test confirms your setting before you commit to your project.
When to Use Different Depth Settings: A Quick Guide
It’s helpful to have a general idea of when you might want to adjust your depth control. Here’s a simple breakdown:
| Project Type / Goal | Desired Nail Depth | Adjustment Suggestion |
|---|---|---|
| Trim Work (Baseboards, Crown Molding) | Slightly below the surface, to allow for easy filling and painting/staining. | Start with a moderately shallow setting. Aim for a tiny dimple. |
| Cabinetry & Fine Furniture | Flush with the surface or very slightly proud, depending on whether you’ll fill or use headless nails. | Precise control needed. Test carefully to find the perfect flush setting. |
| Subflooring / Decking (if using a nailer for this) | At or slightly below the surface to prevent tripping hazards. | Deeper setting, ensuring good penetration into joists. |
| Framing (if using for temporary bracing) | Deep enough for a strong hold, generally flush or slightly countersunk is fine. | Prioritize holding power. Adjust for material thickness. |
| Softwoods (Pine, Fir) | May require shallower settings to avoid splintering. | Test for slight dimpling, not deep compression. |
| Hardwoods (Oak, Maple) | May require deeper settings to achieve adequate penetration. | Test to ensure the nail is fully driven without damaging the surface. |
This table is a starting point. Your specific wood, nailer, and desired finish will always dictate the final setting.
Troubleshooting Common Nail Depth Issues
Even with the best intentions, you might run into some snags. Here’s how to fix them:
Problem: Nails are consistently too deep.
- Likely Cause: Depth control is set too deep.
- Fix: Adjust the depth control towards a shallower setting. Also, ensure you aren’t applying excessive downward force that’s driving the nail too far. Try the “Nipple Flush” technique with slightly less pressure.
Problem: Nails are consistently too shallow (sticking out).
- Likely Cause: Depth control is set too shallow.
- Fix: Adjust the depth control towards a deeper setting. Ensure you are applying adequate, firm pressure to the workpiece. Check that the safety contact tip is clean and fully depressing.
Problem: Nail depth is inconsistent (some deep, some shallow).
- Likely Cause: Inconsistent pressure on the trigger or workpiece, or a dirty safety contact tip.
- Fix: Focus on uniform pressure and a firm “Nipple Flush” contact. Clean the nose of the nail gun thoroughly, especially the safety contact tip. Ensure your air pressure (for pneumatic) is stable and set correctly. Check for any obstructions in the magazine or driver mechanism.
Problem: Nail splinters the wood surface.
- Likely Cause: Nail is set too deep, especially in soft woods or at an angle.
- Fix: Adjust the depth control to be shallower. Ensure the nail gun is held perfectly perpendicular to the surface. Test on scrap material first.
Problem: Nail blows through the backside of thin material.
- Likely Cause: Depth setting is too deep for the material thickness.
- Fix: Adjust the depth control to a much shallower setting. Consider using a nail gun designed for finer work (like a brad nailer or finish nailer) if you are working with very thin materials, as framing nailers can be overly powerful. For extremely thin materials, you might need to use adhesive in conjunction with very small nails and a shallower depth setting, or clamp the pieces together so there’s more support behind the nail.
If you’ve tried everything and are still having issues, consult your nail gun’s manual or contact the manufacturer’s customer support. Sometimes, a tool might need maintenance.
Frequently Asked Questions (FAQ) About Nail Gun Depth Control
Q1: What does nail gun depth control actually do?
A1: Nail gun depth control determines how far below the surface of your material the nail head is driven. Adjusting it correctly ensures nails are flush, slightly countersunk, or proud as desired for your project.
Q2: How do I know if my nail depth is set correctly?
A2: The ideal depth depends on your project. For most finishing work, you want the nail heads to be flush or slightly below the surface. For structural work, they should be well-seated. Always test on scrap material to find the perfect setting.
Q3: Can I adjust the depth on any nail gun?
A3: Most