Acacia hardwood floors offer a stunning, durable, and eco-friendly flooring choice for DIYers. This guide covers everything beginners need to know about acacia, from its unique properties to installation and care, ensuring a beautiful and long-lasting finish.
Thinking about new floors? Acacia hardwood is a popular choice, and for good reason! It’s tough, looks gorgeous, and can be a fantastic option for your home. But if you’re new to flooring projects, the thought of picking and installing hardwood can feel a bit overwhelming. Don’t worry, though! I’m here to walk you through everything you need to know about acacia hardwood floors. We’ll break it down step-by-step, making it easy to understand and even easier to tackle yourself. Get ready to transform your space with confidence!
Table of Contents
What Exactly Are Acacia Hardwood Floors?
Acacia hardwood floors come from the acacia tree, a fast-growing tree found in many parts of the world, especially Australia, Asia, and Africa. What makes acacia so special for flooring is its natural hardness and beautiful, varied grain patterns. Each plank can show off a unique blend of colors, often ranging from light tans and golden browns to darker, richer hues. This natural variation gives acacia floors a distinctive, sophisticated look that can really liven up any room.
The Unique Appeal of Acacia
Compared to some other hardwoods, acacia stands out. It’s known for its excellent durability, often ranking high on the Janka hardness scale. This means it can stand up well to everyday wear and tear, making it a great choice for busy households with kids and pets. Plus, its exotic origins and striking grain patterns add a touch of natural luxury that’s hard to beat.
Pros and Cons of Acacia Hardwood Floors
Like any flooring material, acacia has its advantages and disadvantages. Knowing these will help you decide if it’s the right fit for your project. Let’s take a look:
| Pros | Cons |
|---|---|
| Excellent Hardness & Durability: Ranks high on the Janka scale, resisting dents and scratches. | Moisture Sensitivity: Like most hardwoods, it can expand or contract with significant humidity changes. |
| Unique Beauty: Rich colors and distinctive grain patterns offer an exotic look. | Potential for Variation: Natural color variations can sometimes be significant between planks or batches. |
| Eco-Friendly Option: Acacia is a fast-growing tree, making it a more sustainable choice. | Can Be Pricier: Depending on the species and grade, it might be more expensive than some common hardwoods. |
| Good Value: Offers a premium look and feel for its cost, often less than other exotic hardwoods. | Requires Proper Installation: Like any hardwood, it needs careful installation to prevent issues. |
| Easy Maintenance: Simple cleaning keeps it looking great. | Susceptible to Fading: Prolonged direct sunlight can cause colors to fade or darken. |
| Hypoallergenic: A good choice for allergy sufferers as it doesn’t trap dust and dander like carpet. | Can Be Noisy: Hardwood floors can sometimes be noisier than softer options, especially with high heels or dropped items. |
Understanding the Janka Hardness Scale
You’ll often hear about the Janka hardness scale when discussing hardwood floors. It’s a simple way to measure how well a wood can resist denting and wear. The scale works by measuring the force needed to embed a steel ball halfway into a piece of wood. Higher numbers mean harder wood. Acacia species typically score very well on this scale, often ranging from around 2,200 to 3,000+ pounds-force, putting them in competition with or even surpassing popular woods like oak and maple for durability.
For a deeper dive into wood hardness, you can check out resources like the Woodworking Network’s guide on Janka hardness.
Choosing Your Acacia Hardwood Flooring
When you’re ready to buy, you’ll find acacia flooring available in a few different forms, and each has its own advantages.
Solid Acacia vs. Engineered Acacia
This is a big decision for any hardwood project:
- Solid Acacia: These planks are milled from a single piece of acacia wood. They offer the most authentic hardwood experience and can be sanded and refinished multiple times over their long lifespan. However, they are more sensitive to moisture and temperature changes and can be more expensive.
- Engineered Acacia: This type of flooring is constructed with layers. The top layer is real acacia hardwood, but underneath are layers of plywood or HDF (high-density fiberboard). This construction makes engineered acacia more stable and resistant to humidity fluctuations, making it suitable for basements or areas with changing conditions. It can usually be sanded and refinished once or twice, depending on the thickness of the top veneer.
Acacia Flooring Finishes and Styles
Beyond solid or engineered, you’ll also encounter different finishes and styles:
- Finishes: This refers to the protective coating applied to the wood. Common finishes include polyurethane (offering good durability and a range of sheens from matte to high gloss), UV-cured finishes (very tough), and natural oil finishes (which enhance the wood’s natural look but require more maintenance).
- Colors: Acacia comes in a wide spectrum of natural colors. Lighter shades like honey or blonde can make a room feel brighter and more open, while darker shades offer a more dramatic and luxurious feel.
- Grain Patterns: Look closely at the grain. You might find very straight, uniform patterns or more adventurous, wavy, and interlocking grains. Some acacia varieties are known for their highly figured or “tiger stripe” patterns.
- Plank Widths: Flooring comes in various plank widths, from narrow strips to wide, statement planks. Wider planks can make a room feel more modern and spacious.
The Installation Process: A Beginner’s Guide
Installing acacia hardwood floors can be a rewarding DIY project! While it requires patience and attention to detail, breaking it down helps a lot. Here’s a general overview of how it’s done, focusing on the most common methods.
Step 1: Planning and Preparation
This is the most crucial stage for a successful installation. Don’t rush it!
- Measure Your Space: Calculate the square footage of the area where you’ll install the flooring. Always add an extra 10-15% for cuts and future repairs.
- Acclimate the Flooring: This is super important! Hardwood needs to adjust to the humidity and temperature of your home. Leave the unopened boxes of acacia flooring in the room where they’ll be installed for at least 48-72 hours.
- Prepare the Subfloor: The subfloor (the layer beneath your current flooring) needs to be clean, dry, level, and structurally sound. Remove any old flooring, staples, or adhesive. Check for high spots and low spots. If it’s not quite level, you might need to use a self-leveling compound. A level subfloor is key for a good-looking and long-lasting floor.
- Choose Your Installation Method: Depending on the type of acacia flooring (solid vs. engineered) and your preference, you’ll likely use one of these methods:
- Nail-Down: This is the traditional method for solid hardwood where planks are attached to a wooden subfloor with nails.
- Glue-Down: Planks are adhered directly to the subfloor using a special flooring adhesive. This can be used for both solid and engineered wood.
- Floating Floor: Planks interlock (click-lock or tongue-and-groove) and are not attached to the subfloor. An underlayment is typically used beneath the planks. This is most common for engineered wood and laminate, but some engineered acacia options utilize this method.
Step 2: Laying the First Row
The first row sets the tone for the entire floor. Make sure it’s perfect!
- Determine Direction: Typically, you’ll lay the planks perpendicular to the floor joists for the strongest installation, or in the longest direction of the room for the best visual appeal.
- Cut Away Tongues: For the planks that will face the walls, you might need to carefully cut off the bottom tongue of the plank. This allows the plank to sit flat against the wall.
- Install the First Plank: Place the first plank with its grooved side facing the wall. Use spacers (about 1/4 inch or 6mm) between the plank and the wall to allow for expansion.
- Secure the Plank: If nailing, use your nailer to drive nails at an angle through the tongue of the plank into the subfloor. If gluing, apply the adhesive to the subfloor according to the manufacturer’s instructions.
- Continue the Row: Connect the next plank to the first by ensuring the tongue and groove fit snugly. Continue this process across the entire first row, cutting the last plank to fit.
Step 3: Laying Subsequent Rows
This is where the floor starts to take shape!
- Stagger Your Joints: For strength and appearance, stagger the end joints of the planks in each row. A good rule of thumb is to have at least a 6-inch offset between the ends of planks in adjacent rows. This prevents weak spots and looks more natural. You can achieve this by using the offcut from the end of one row to start the next.
- Advance the Rows: For each new row, fit the tongue into the groove of the previous row. For nail-down installations, you’ll typically nail through the tongue. For glue-down, apply adhesive and then press the plank into place.
- Use a Pull Bar: For the last plank in a row, fitting it can be tricky. A pull bar is a handy tool that fits behind the plank and allows you to gently tap it into place.
- Cutting Around Obstacles: You’ll need to make precise cuts for doorways, vents, and other obstacles. A jigsaw or oscillating multi-tool is perfect for these intricate cuts. Remember to leave expansion gaps around all fixed objects.
Step 4: The Final Touches
Almost there! Let’s finish it off.
- Install the Last Row: The last row will likely need to be face-nailed or face-glued, as there might not be enough room for a nail gun or tongue engagement. For face-nailing, drive nails carefully through the plank face and then fill the holes with wood putty that matches your floor color.
- Install Trim and Moldings: Cover the expansion gaps at the walls with baseboards and quarter-round molding. These pieces are typically nailed or glued into place.
- Clean Up: Remove all spacers, dust, and debris.
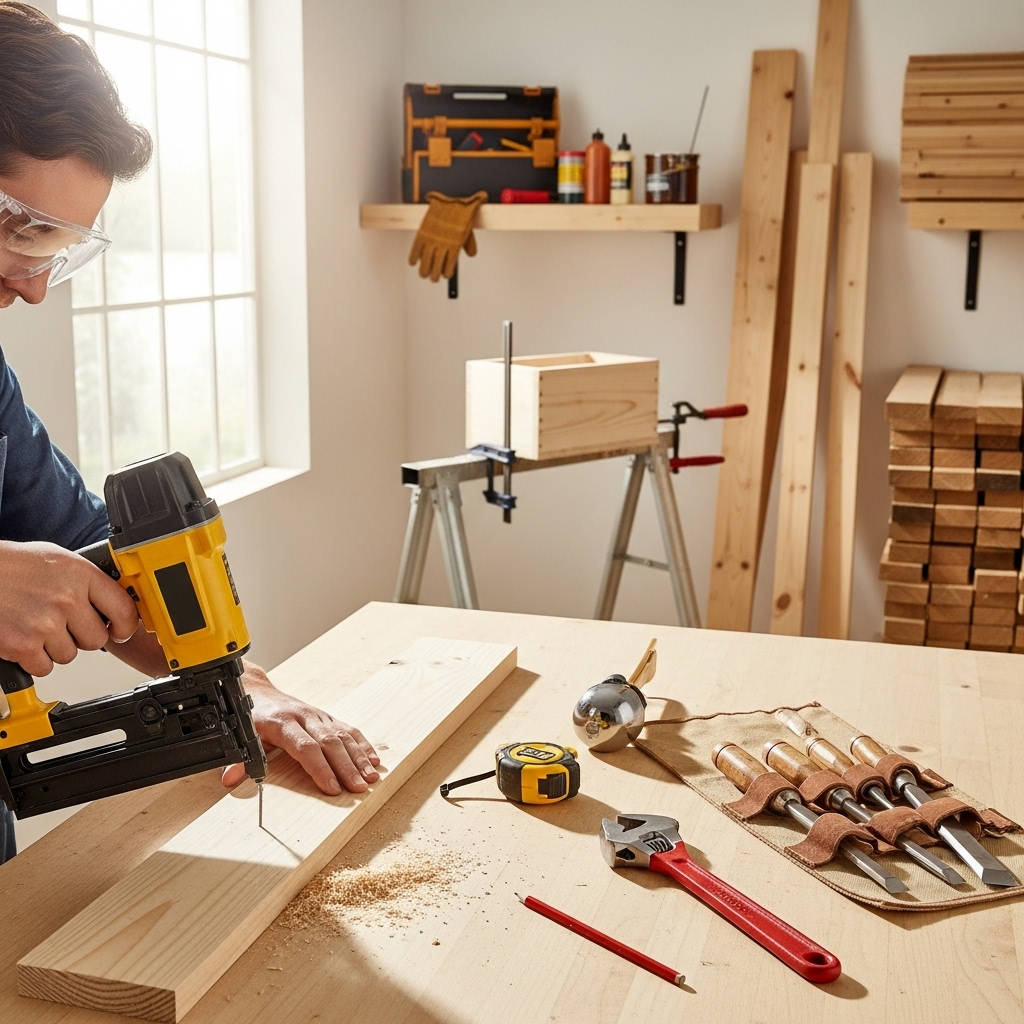
Essential Tools for Acacia Flooring Installation
Having the right tools makes all the difference in a DIY flooring project. Here’s a list of what you’ll likely need:
- Measuring Tape: For precise measurements.
- Pencils: For marking cuts.
- Chalk Line: To mark straight lines for your first row or for long cuts.
- Safety Glasses: Always protect your eyes!
- Work Gloves: To protect your hands.
- Knee Pads: You’ll be on your knees a lot; these are a lifesaver.
- Utility Knife and Blades: For scoring and cutting.
- Miter Saw: For making clean, straight cuts on planks.
- Jigsaw or Oscillating Multi-Tool: For cutting around curves and obstacles.
- Flooring Nailer (for nail-down): This specialized tool makes installing hardwood much easier and faster. You can often rent these.
- Chisel: For removing stubborn adhesive or staples.
- Hammer: A standard hammer for various tasks.
- Flooring Bar/Pry Bar: Essential for pulling the last planks into place.
- Underlayment and Spacers: For floating floors or as an added moisture barrier/sound dampener.
- Flooring Adhesive (for glue-down): Specific adhesive recommended by the flooring manufacturer.
- Broom and Dustpan/Vacuum Cleaner: For keeping the work area clean.
Caring for Your Acacia Hardwood Floors
Once your beautiful acacia floors are installed, keeping them looking great is pretty straightforward. Regular care will help them last for years.
Daily and Weekly Cleaning
- Sweep or Vacuum Regularly: Use a soft-bristle broom or a vacuum with a hard floor attachment to remove dust, dirt, and grit. These small particles can act like sandpaper and scratch your floor over time.
- Wipe Up Spills Immediately: Don’t let liquids sit on the floor. Use a slightly damp cloth or mop to clean up spills right away. Soaked floors can lead to warping or staining.
- Use a Microfiber Mop: For general cleaning, a well-wrung-out microfiber mop is ideal. Use a hardwood floor cleaner recommended by the manufacturer, or a very mild soap and water solution. Avoid excessive water.
Deep Cleaning and Protection
- Avoid Harsh Chemicals: Never use abrasive cleaners, ammonia-based products, or excessive water. These can damage the finish and the wood.
- Use Furniture Pads: Put felt pads on the legs of all furniture. This is one of the best ways to prevent scratches and dents.
- Use Doormats: Place mats both inside and outside entryways to catch dirt, sand, and moisture before they reach your floors.
- Protect from Sunlight: Prolonged, direct sunlight can fade or darken wood floors over time. Consider using curtains or blinds to limit exposure, especially during peak sun hours.
- Maintain Humidity Levels: Aim for a stable indoor humidity level, usually between 40% and 60%. This is crucial for preventing expansion and contraction of the wood. A humidifier or dehumidifier might be necessary depending on your climate. For tips on humidity control in homes, the EPA provides great advice.
Refinishing Acacia Floors
Over many years, even the most durable floors can show wear. Solid acacia and engineered acacia with a thick wear layer can be sanded down and refinished to look like new again. This process involves sanding off the old finish and a thin layer of wood, then applying a new protective coating. It’s a more involved process and usually best left to professionals, but it gives your floors a new lease on life.
Acacia Flooring in Different Rooms
Acacia’s durability and beauty make it suitable for many areas of your home.
- Living Areas: Perfect for living rooms and dining rooms, where its natural beauty can be a focal point.
- Bedrooms: Offers a warm and inviting feel.
- Hallways and Entryways: Its hardness stands up well to foot traffic, but always use doormats to protect it from grit.
- Kitchens: While beautiful, kitchens have higher moisture potential from spills and appliances. Engineered acacia or very diligent maintenance might be needed here. Ensure the finish is water-resistant.
- Bathrooms: Generally, hardwood is not recommended for full bathrooms due to extreme moisture. If you’re considering it for a powder room with minimal water exposure, ensure it’s engineered acacia with a robust, water-resistant finish and be extremely vigilant with cleanup.
Frequently Asked Questions
Q1: Is acacia hardwood good for DIY installation?
A1: Yes, acacia can be a good choice for DIYers, especially engineered acacia with click-lock systems. Solid acacia requires more specialized tools like a flooring nailer but is still manageable with careful prep and patience.
Q2: How does acacia compare to oak or maple?
A2: Acacia is typically harder than oak and often comparable to or harder than maple, based on the Janka scale. This means it’s generally more resistant to dents and scratches.
Q3: Can I install acacia hardwood over existing floors?
A3: It depends on the existing floor. You can usually install over a clean, flat, and stable vinyl or tile subfloor (check manufacturer guidelines). Most hardwood cannot be installed over carpet or existing plank flooring unless it’s a very specific type of engineered wood designed for this.